
Simple Homebrew Campaign time again. And again, there’s a crap-ton of s$&% to cover. Except, it turns out, there’s not as much as I thought. It’s hard to predict this s$&%.
See, before I outlined this s$&%, I was worried that I’d have barely anything to say. Because this whole Starter Region thing’s pretty much the most open and most creative and least systematic part of the whole Simple Homebrew Campaign startup process.
But then, I outlined the article. And I ended up with two pages of outline. Which, for comparison, is twice as many pages of outline as I usually start an article with. Yep. My 5000-word behemoths grow from single-page outlines. Never underestimate the power of bulls$&%.
So, when I wrote the first draft, the Long, Rambling Introduction™ was all about how the article was going to be too f$&%ing long for a Long, Rambling Introduction™.
But now that I’m rewriting the draft…
Anyway, this has been the Long, Rambling Introduction™.
Let’s make a map.
Your Starter Region: Is the Map Half-Empty or Half-Full
You’re either gonna love this or you’re gonna hate it. In today’s Simple Homebrew Campaign Startup lesson, I’m going to show you how to map the geographical region around your Starter Town. And that can be a nice, relaxing, low-pressure activity. Hell, it’s the easiest, lowest-stakes part of running a campaign. It’s something you’ve got to do, but how you do it doesn’t matter at all.
In other words, if you chill the f$&% out, you can just enjoy this s$&%.
But you won’t, will you? You’re gonna try to get this right. However you define getting it right. You’ll worry about properly distributing the map features. You’ll worry about how far away things should be. You may even worry about utterly stupid, useless, pointless bulls$&% no real human gives a f$&% about like rain shadows and prevailing winds and plate tectonics.
And if it weren’t for that fact — if it weren’t for you — I could crank out this lesson in 3000 words tops. But I know you won’t be happy without a process and a lot of hand-holding. So, compromise time.
I’m gonna do my best to give you solid concepts and useful advice. But you need to do your best to calm your tits, relax, and just enjoy an act of low-stakes creation. Because it is low stakes. All you’re doing is drawing a map. What’s on the map barely f$&%ing matters. The map itself — its existence — is what matters.
And that’s because the map you’re drawing — technically the two maps you’re drawing — are both totally blank maps.
You heard me.
A Tale of Two Maps
If your game involves any wilderness travel at all — if it ain’t limited to a small area where everything’s a couple hours at most away from everything else — you need a map of the local geographical area. A Regional Map. That ain’t optional. Town maps and encounters? Totally optional. A Regional Map is a must-have.
Moreover, a proper Regional Map is actually two maps. The GM’s Regional Map and the Players’ Regional Map. You must make both. And they must be separate. Different. They serve different purposes and they show different information. I know some of you experienced GMs think you can draw just one Regional Map and then hide the grid and the secret locations and print a copy for your players.
You can’t. You’re wrong. Sorry, not sorry.
The GM’s Regional Map
Your Regional Map — the GM’s Regional Map — is a game mechanic. It’s not a pretty picture. And it’s not meant to be. It’s not meant to look like a map or show the world as it is. It’s a game-mechanical diagram. That’s why most GMs — the smart ones — use simple, hex-based tilemaps. Maps like this:
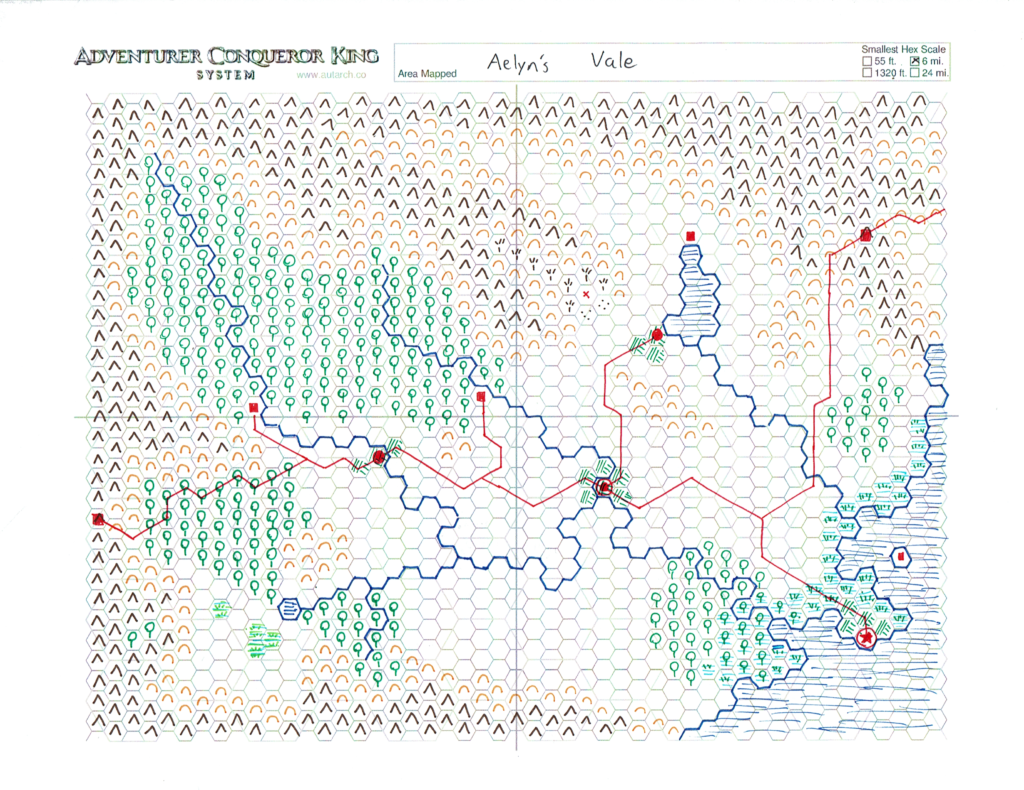
That’s the GM’s Regional Map from my AOWG. And it’s a damned good regional map. It’s not a good map for a Simple Homebrew Campaign. It does some s$&% wrong. I just want you to see what it looks like. Also, ignore the fact that it’s got no labels. Pretend I labeled things.
A GM’s Regional Map is precise. A GM can — within three miles — plot the exact position of any f$&%ing thing anywhere in the world. A GM’s Regional Map is mechanical. The world’s broken down into chunks. Spaces. Six-mile hexes in this case. Thus a GM can easily plot movement and resolve actions without doing a lot of measuring and math. And that’s important because the GM’s Regional Map — along with a few supplemental notes — is used for running games. For adjudicating travel actions.
It’s for running games. At the table. Not for looking at.
The Players’ Regional Map
By contrast, the Players’ Regional Map is a pretty picture. As pretty as you can make it given your cartography skills and how much you’re willing to spend on software and how much time you’ve got to waste on it.
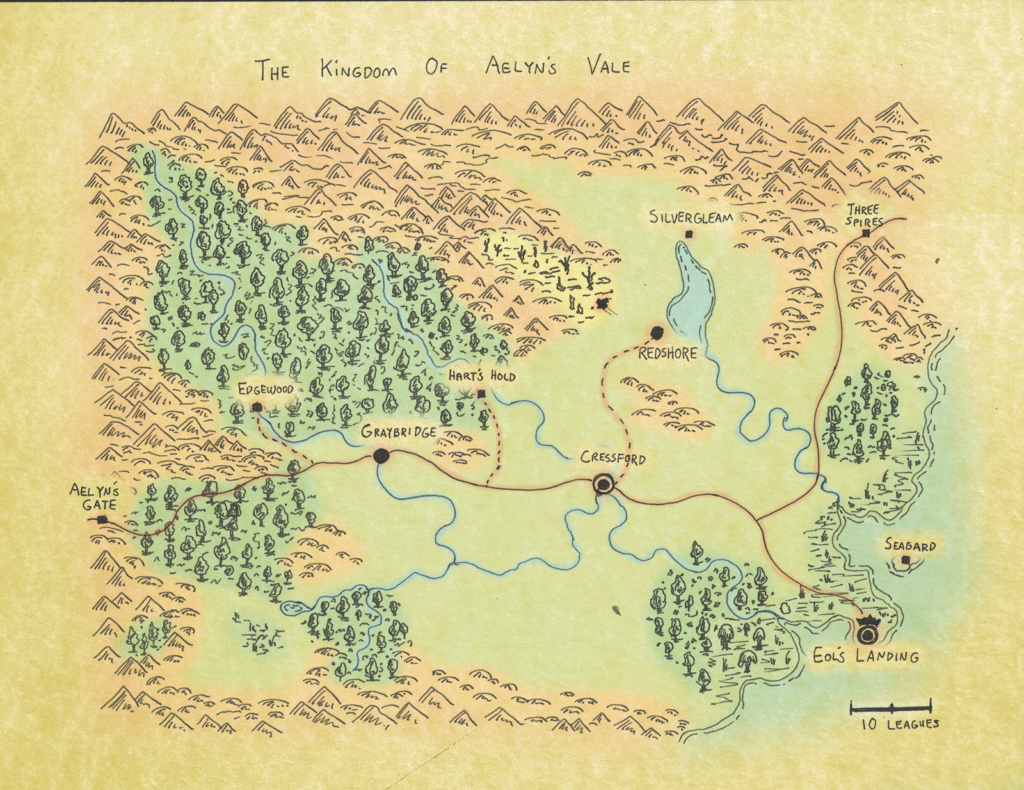
Pretty right?
But, look, it doesn’t have to be that pretty. Blobby lines and scribbles are perfectly fine too. You don’t want to invest too much time and money into this s$&%. But this is one of those investments that’ll actually improve the play experience. So, if you’ve got one or two hours to spend on this s$&%? Spend it. If not? Don’t sweat it.
Where the GM’s map is precise, the player’s map is vague. Sure, it’s got a scale. But look at that scale. It’s obviously off. And it’s hard to tell where the forests and hills actually are. Where the GM’s map is a game mechanic, the players’ map is a visual aid. It helps the players picture the world. Which is why it looks like a map and not a tileset from an 8-bit Dragon Quest adventure. The players’ map represents their knowledge of the world. As such, it looks like something that could exist in the world. Hell, it might be a physical map the characters own. Or at least one they could buy or find. So it gives the players a sense of living in the world.
And where the GM’s map is used for plotting and adjudicating, the players’ map is used for making plans and making choices.
Yeah, I realize that doesn’t jive with that whole imprecise and vague thing. It seems like a planning and decision-making tool should be accurate, right? Precise. But it shouldn’t be. It mustn’t be. For the same reasons that players roll dice to resolve actions. The players should never be able to form perfect plans and make perfect choices. The actual outcomes should always vary from expectations. The imprecision in the Players’ Regional Map is the geographical equivalent of rolling a d20.
At best, the players can guess a trip’s going to take, say, five days. And even if they make every navigational roll and no random encounters f$&% them up, it might still take a few hours more or a few hours less, pushing them into an extra day. And thereby forcing them to hedge their bets and to take extra supplies just in case.
When I Say Map…
So, there’s two different kinds of Regional Maps, right? The GM’s Map and the Players’ Map. Except they’re really two different depictions of the same, single map. Of the two, the GM’s Regional Map is the realer one. The one that’s actually how the world is. The Players’ Regional Map is how the world looks. Think of the GM’s Regional Map as the world’s stat block. And the Player’s Regional Map is the flavor text. The description and the lore.
Point is, from here on out, when I talk about drawing and planning maps, I’m talking about the GM’s Regional Map. Mostly. When I’m not, I’ll either make it clear or else I’ll trust you to infer it from context. Which will no doubt lead to all sorts of confusion and make me regret ever trusting you to use your brains for anything.
Just read map as GM’s Regional Map from this point forward. Cool?
When Blank Doesn’t Mean Blank
Above, I told you you’d be drawing a pair of blank maps. And that probably sounds f$&%ing crazy. Does that mean you can just grab a sheet of paper and fling it at me? “Done! Here’s a blank map!”
No. Don’t be a moron.
See, you think you know what it means for a map to be blank. But you don’t. Those two maps I showed you above? They’re blank. Mostly blank. They’re a little less blank than the maps you’ll be drawing today. But not much less.
It’s all down to the two kinds of information on the map.
See, it’s helpful to think of your map — your GM’s Regional Map — as having two different layers. An underlay and an overlay. A background and a foreground. The underlay — the background — is the Terrain Layer. And the overlay — the foreground — is the POI Layer.
The Terrain Layer
The Regional Map — the GM’s Regional Map; last f$&%ing reminder — divides the world into hexes. And every hex is marked with a symbol that describes the predominant terrain type that fills that part of the world.
And don’t get pedantic. Blank is a symbol.
“Well, no s$&% Angry,” you’re probably saying. “Thanks for explaining that maps show terrain. That’s what maps do.” But you forget, smarta$&, this ain’t a map. It’s a stat block. A game mechanic. An action adjudication tool. It empowers you — the GM — to set the scene, determine how actions play out, and describe the results.
That’s why it’s a hex map with terrain icons.
See, terrain’s a game mechanic. Which, by the way, ain’t the same as a rule. I think that needs an article’s worth of explanation someday. But not today.
Terrain’s a game mechanic. The terrain you’re in determines how far you can see. It modifies the actions you take. The terrain you’re moving through determines how fast you move. The terrain you’re navigating determines how difficult it is to navigate. And the terrain surrounding you determines what kind of hazards and complications and monsters are likely to f$&% you up. And, in a very vague and non-mathy way, the terrain you’re trekking through says something about how challenging you expect your life to be.
Gamers intuitively know that it’s easier and safer to travel across open land than it is to travel through a forest. Or over hills. Or through a swamp. Mountains are really hard to deal with. Possibly impassable. And oceans are impassable without special tools and abilities. Players grasp this so intuitively that they’ll usually plan routes around swamps when they can. Because adventuring in a swamp sucks.
Point is, though, that the terrain in any given hex is mostly just a background thing. It determines a bunch of mechanical things about traveling and trekking and it affects what kinds of adventuring things happen when and where and it provides cues when you’re setting and describing scenes and actions. But it’s still just background.
The Right Number of Symbols
So, how many different kinds of terrain are there? How many different symbols? Where’s the pretty map key? Here’s the thing: you can go crazy-a$& bonkers with this s$%&. Pop into your search engine of choice and you can find hundreds of symbol sets, some with way, way, way too many symbols. Hell, if I slapped together a list, I could probably define 30 different terrain types and assign each a symbol.
Don’t do that.
The D&D 5E PHB defines seven natural, outdoor terrain types. And it’s probably best to follow the PHB’s lead. Especially if you’re running D&D 5E. That way, your GM’s Regional Map matches up with the game’s mechanics right? You won’t ever have to puzzle out whether a hex of boreal forest counts as forest or arctic terrain for game-mechanical purposes.
That said, the 5E list is a little, teensy, tiny bit limited. So here’s my list of terrain types that are symbol-worthy.
- Arctic. Open and cold terrain. Includes tundra, glacier, icefields, and cold deserts.
- Desert. Arid, open terrain. Includes sandy deserts, rocky deserts, and salt flats.
- Forest. Any terrain covered with lots of trees. Includes temperate forests, rainforests — which themselves include jungles, temperate rainforests, and cloud forests — boreal forests, and montane or alpine forests.
- Grassland. Open land that’s not too rugged. Vegetation includes grasses, underbrush and occasional scattered trees. Includes plains, steppe, savannah, veldt, moorland, meadow, shrubland, wasteland, and farmland.
- Hill. Navigable land with highly variable elevations. Includes rocky hills, grassy hills, mesas, and canyons.
- Mountain. Like hills, but more so. Difficult or impossible to navigate.
- Swamp. Flat wetlands. Includes grassy marshes, sparse bogs, coastal salt marshes, and forested swampland.
- River and Lake. Freshwater bodies of water. Duh.
- Ocean. Really big lakes you can’t drink from.
- Road. A special kind of terrain that runs through other terrain types and makes them easier to navigate. Includes roads, trails, paths, highways, bridges, fords, and mountain passes.
That’s it. From a game-mechanical stance, that’s all you need on your map’s Terrain Layer. Of course, you’ll also have some supplemental notes. For example, a desert symbol in a hex tells you to resolve actions as if the party’s in a desert. Your notes tell you the Raxilaxi Expanse is a mix of rocky desert and salt flats with a few isolated mesas scattered throughout.
Name That Landform!
Your map needs some supplemental notes, right? Those’ll help you narrate your game, plan adventures, and fling random disasters at your hapless victims. Thus, it’s important to name the different terrain areas on your map. Each contiguous mass of a given terrain type needs a name. An in-game, in-world name. That desert? That’s the Raxilaxi Expanse. That line of hills? That’s Breakhero Ridge. That big, open space? That’s Pieren’s Sweep. Hell, if a feature’s big enough, it might comprise two or three different terrain areas. Maybe the western part of those grasslands — close to the Raxilaxi Expanse — is sparse and dry and it’s called the Tanga Waste while the eastern part’s more verdant and it’s called the Tanga Meadowlands.
By naming the clumps of terrain, you’ve got a heading you can put notes under. You can describe the Tanga Waste and even make a unique random encounter table for it. Or assign it a difficulty. Or even give it special rules because it works a little different from a normal grassland but it’s not as bad as a desert.
Having trouble with this s$&%? Check out the Breath of the Wild interactive map. Turn off all the map markers and just scroll around. Every lake, river, hill, forest, and open f$%&ing plain has a name. Do the same thing. Hell, just steal BotW’s names. Seriously. Who’s going to recognize the Barula Plain or the Temto Hills or Cape Cresia? And if someone does recognize it and call you out, just kill their f$&%ing character.
The POI Layer
Sitting atop the Terrain Layer’s the POI Layer. The Points of Interest Layer. And that’s the layer that makes the game. That’s where all the destinations are. The places the players want to go. Or want to escape. Castles, cities, towns, camps, outposts, henges, mounds, sanctuaries, dungeons, crypts, tombs, barrows, shrines, ruins, battlefields, spirit groves, coves, caves, and on and on and on and on.
It’s the POI Layer that’s actually got the good stuff. And, when you start your Simple Homebrew Campaign, it’s mostly blank. Because you only add s$&% to the POI Layer when you need to. Either when you plan an adventure or when you define a location through gameplay.
Note, also, there’s a kind of scope and scale thing going on here. I don’t have time to go into it. Basically, not everything’s worth marking on the POI Layer. For instance, the tiniest of villages and market squares and s$&%? I don’t put that stuff on the map. And my world’s full of monster lairs — like owlbear caves and harpy nests — that feel like adventure sites, but they’re small and random and they’re the kind of thing the party trips over, clears, loots, and then never thinks about again.
Anyway, my map above? It’s mostly blank. All it shows are major, civilized Points of Interest whose locations are known throughout the kingdom. It doesn’t even show any villages. Just towns, castles, cities, and the capital. And one ruin. Your Simple Homebrew Campaign Regional Map will have even less on it. It’ll have your Starter Town, the first adventure’s site, and maybe one or two other dots.
Beyond that? The map’s just a terrain underlay waiting for you to plot s$&% over it.
Hexes and Scales
Before I turn you loose to start drawing, I want to discuss the whole hex-and-scale thing.
The GM’s Regional Map is a hex map. That’s the right way to do it. Any other way is wrong. Why? For lots of reasons. It is scientifically, mathematically, and geometrically provable that the hexagon’s the best polygon for overland map grids. And because you’re going to be plotting and adjudicating at the table with this thing — and because you don’t want to be dicking around with a ruler, a protractor, and a scale-arm compass every time your players change their travel plans or get lost mid game — you need a grid.
So hex map. Use it.
The correct scale is six miles. That is, every hexagon is six miles across. Basically, a hex covers an area with a three-mile radius. Why? Because in open terrain, that’s about how far people can see. Sure, that’s an idealized take, but it’s close enough for pretend elves. That means, in an open hex — not a forest — the PCs can see the whole hex from its center.
Moreover, characters generally travel two or three miles an hour. So it’s easy to use six-mile hexes. It takes two or three hours to move from one hex to the next. How long’s the party been traveling? Count hexes. How many hexes does the party move? Divide the hours by two or three. This is easy f$&%ing math.
The six-mile scale also facilitates some simple-a$& rules of thumb. For instance, a normal party travels four hexes a day. A slow one travels three. If the party’s slowed by terrain, subtract a hex. If they’re really slowed, subtract two. Simple.
How about this one? If the adventure’s site is within two hexes of Town, you’ve got a one-day adventure. It’ll take the party three or four hours to get there, three or four hours to get back, thus leaving them two hours to dick around onsite and still be back before dark. Sure, if they get delayed, they’ll have to camp out overnight. But even if they totally forget to plan, they can get back to town long before disaster.
Assuming a small site, every two hexes from Town extends the adventure by one day. If the site’s big, add on an extra day. So, if the party’s exploring a large site that’s four hexes from town, they can get back to town by dark on the third day assuming they handle things efficiently.
Which they won’t. But rules of thumb are just planning and estimating tools.
Anyway…
Let’s Make a Map
Enough conceptual explanatory bulls$&%. It’s time to draw a map.
How?
First, a regional map’s drawn in three steps.
Sketch then Hex then Art
To draw a regional map, start by lightly sketching the region’s Terrain Layer. Decide what terrains go where. Either sketch lines for coasts, mountain ranges, rivers, and hills or outline blobs of forests, hills, swamps, lakes, and so forth. Then draw a hex map from the sketch. That’s the GM’s Regional Map. Now, use that as a guide to draw an arty, fuzzy, mostly-to-scale-ish Players’ Regional Map.
How do you actually draw this s$&%? That depends on what kind of tools you want to use.
The Analog Way
If you’re into paper and pencils — even if you’re going to scan them and tweak them digitally — start with a sheet of hex paper. I highly recommend these printable region map templates published by Autarch for their Adventurer Conquerer King RPG system.
In pencil, lightly sketch the region’s terrain onto the hex map until you like the sketch. Then, grab some colored pens and fill in the hex symbols. Then, erase the sketch lines and voila: you’ve got your GM’s Regional Map.
Now, grab a sheet of tracing paper. Unless you’re super cool and have a light table like I do. Put the hex map under the tracing paper, lightly outline the features with a pencil, then use that sketch as a guide to draw a pretty map. Bingo bango, Players’ Regional Map done.
If you decide to get ultra-fancy and scan your Players’ Regional Map for a digital touch-up — as I did with the Aelyn’s Vale maps above — remember that you’ve got to add dots to the map as the players discover them. Make sure you can do that easily.
If you stick with a hand-drawn Players’ Regional Map, I recommend you use subtle colors and light lines for the terrain details and high-contrast colors and heavy lines for the points of interest so they’re easy to see. And so it’s easy to add new ones over the terrain later.
The Digital Way
Even if you want to do everything in your magical computer box, you still need to start with a sketch. You can do it on paper or you can do it in some s$&% drawing tool like MS Paint. It’s just lines and blobs.
The best way to handle your GM’s Regional Map is with a hex-based tile-mapping utility. Like Hexographer II: Worldographer. Most such utilities let you import a graphic file as an underlay to place tiles over. So that makes going from sketch to hex easy.
Next, get yourself an art-based mapping utility. Like Inkarnate or Wonderdraft. Some utilities let you import a graphical underlay, so you can trace over your GM’s Regional Map. Others don’t. So just turn on a hex grid and eyeball things. That’ll make things nicely fuzzy. Remember, you want fuzzy. Don’t match the Players’ Map too closely to the GM’s Map if you’re tracing the one over the other.
Which, by the way, is why you can’t draw one map in your software of choice and turn on and off the hex grid. I know it seems like you can. It seems easy. And it shouldn’t matter. But it does. So don’t. Trust me. This is another one of those game design psychological tricks that’ll change the way you map, plan, and manage your game. I s$&% you not.
Tile-based hex maps with one terrain type per cell are for GMs. Pretty art maps are for players. That’s how it be.
How Big a Map to Make
How big should your map be? Well, that depends on a lot of things. Except it doesn’t. Because this is a Simple Homebrew Campaign and you’re just drawing a Starting Region.
Start with an area that’s 144 miles wide and 96 miles high. That’s a 24-hex by 16-hex space that fits nicely on a single sheet of normal, human 8½ x 11, letter-sized paper.
How to Design a Map
Of course, there’s a big f$&%ing difference between drawing a map and creating a map, isn’t there. Knowing how to draw the lines on the paper or whatever’s useful. But how do you actually decide what goes where?
Well, there’s actually a pretty simple, five-step process.
Step 1: List Your Truths
When you built your First Adventure and your Starter Town, you established a few true things about the world. And some of those might affect your map. For instance, if that first adventure takes place in the Temple of Sludgepuddle in the Muckymoor Swamp two days from town, you sure as hell better make sure that s$&%’s on the map. And if that list of world facts you wrote down when you made your Town includes mention of the dragon that lives on Scorchbelly Ridge, that ridge has got to go somewhere.
So, review your notes and list the things that must appear on the map.
Step 2: Locate Your Town
Now, start your sketch by putting a dot somewhere in the middle-ish portion of your map. It doesn’t have to be precisely in the middle. But it should be within two inches of the middle assuming you’re using a normal piece of paper. That dot’s your Town. Good job. You plotted it.
Step 3: Locate the First Adventure Site
Next, sketch a dot near the Town dot. That’s your Starter Adventure site. If you don’t have any hexes to count and want to make sure it’s the right distance away, keep in mind that an inch is roughly 10 to 12 miles. Two hexes. Assuming you’re following my advice. Don’t worry about getting it exact. You can move it when you turn your sketch into a hex map.
Step 4: Draw a Cool Map Around the Dots
With your Starter Town and First Adventure site plotted, sketch a cool map on the rest of the paper. Draw blobby outlines of terrain features like forests and swamps and draw jaggy lines where the mountain ranges and hilly ridges are. Draw windy lines for rivers and roads and coasts. And don’t forget to include all the things you know are true.
Step 5: Name Everything
Now, give every river, sea, mountain range, forest, and contiguous terrain area a name. Whatever names you want. Pull them out of your a$&% or steal them from your favorite video game map. Doesn’t matter where they come from.
And that’s how you design a map!
Seriously?!
Okay, I can see you’re a little pissed off. I know I pulled a “…then draw the rest of the horse” on you. But that’s how it be. That’s how you do this s$&%. Just draw a map that looks good to you. Relax. Have fun. It’s not like you’re planning anything right now anyway. You’re just putting a terrain backdrop behind two dots. It doesn’t f$&%ing matter.
But you’re not listening are you? No. You can’t handle this blank page s$&%. Honestly, you should learn to handle it. It’ll make you a better GM. And I really, really suggest you try to draw a map without any further help. Even though it’s hard and even though it feels like there’s a lot at stake.
But here’s some quickie little tips to help you get through your first map. As a favor to me, try drawing at least one Regional Map before you read them. Even if you never use it.
Tip 1: Start with One or Two Borders
Blank page scaring the s$&% out of you? Fine. Start by adding one or two borders. Pick one or two edges of your map and draw a wiggly line just inside each. Those lines are either mountain ranges or ocean shores. Or one of each. Sketch the line a few times, making mountains jagglier and coasts wigglier.
There. You started your map.
Tip 2: Add a Major River
Still struggling? How about a nice river? Draw a curvy line across the middle area of your sketch and take it all the way to at least one edge. Now you’ve got a river.
Did you add an ocean shore? Neat. That’s where the river ends. Draw the river to the ocean shore.
Did you add a mountain range? Cool. Rivers start near mountains. So draw it to within an inch of the mountain edge.
Want to make it even more river-like? Find the mid-point. Now, resketch the downriver half of the river to make it snakier and windier. Rivers meander more and more as they get closer to the sea.
Remember that when you draw the Players’ Regional Map.
If you want to get really crazy, add a tributary or two. Smaller rivers that feed into the big river. They should start near mountains too. If possible.
Tip 3: Pick a Predominant Terrain
Is your Starter Region mostly open grassland? Mostly forest? Mostly desert? Cool. Make a note. The easiest maps are mostly grassland. Consider that the default choice. Mostly forest and mostly desert work okay. Mostly swamp, mostly hills, and mostly mountains don’t work very well. Stay away from them. And mostly ocean is for advanced students. You’re on your own with that one.
Tip 4: Identify Three to Five Other Neat Terrains
Got a predominant terrain? Cool. Now list three to five terrain areas that aren’t that terrain to include on your map. You can repeat terrains. So, you can decide your mostly grassland region has two forests, one hilly area, and a swamp. If your list of True Facts About the World mentions any specific features, well, some of your choices just got made for you.
Sketch loose outlines for each of those three to five terrain areas. Just draw a blobby shape and say, “here’s that forest” and “here’s those hills.”
How big should your blobs be?
Tip 5: Keep Your Map Two-Thirds or Three-Quarters Open… Or Whatever
GMs clutter the f$&% out of their maps. My Aelyn’s Vale map is a mess. Don’t make that mistake. Two-thirds to three-quarters of your map should consist of open terrain. Grasslands. Blank hexes. Of course, if you’ve chosen a different predominant terrain — if you’re region’s mostly forest, say — then two-thirds to three-quarters of your map should feature that terrain.
Sketch your blobby features accordingly.
Tip 6: Add Another Settlement… Or Two
Once you’ve got your big terrain choices made and you’ve plotted your Starter Town and First Adventure Site, add another dot somewhere outside the middle region of your map. That’s another Settlement. It’s either one size bigger or one size smaller than the Starter Town.
And if you’re feeling really crazy and want the area to feel more civilized, add two dots. One’s bigger than the Starter Town and one’s smaller.
Tip 7: Don’t Sweat the Science
You might have noticed I forgot to explain how geology and ecoscience work. I’m just telling you draw s$&% wherever. Well, don’t panic. I didn’t forget anything.
Science can go f$&% itself.
Seriously. Don’t worry your pretty little head about s$&% like wind patterns, climate, erosion, or any of the other crap YouTube mapmakers make clickbait videos about. No one cares about that s$&% except pedantic, nitpicky earth scientists and internet cartographers who’ve run out of ideas and are trying to game an algorithm.
Just draw a cool map.
Tip 8: …But Don’t Abandon Common Sense
F$&% science, right? But don’t turn off your brain completely. Because you can do things that’ll make your map look wrong. That’ll disrupt the delicate suspension of disbelief that lets players play your game. People have a weird, intuitive eye for wrongness. Fortunately, so do you. Every so often, look at what you’re sketching and make sure it looks okay to your eye. Look for obvious wrongness. Things like rivers splitting — they rarely do — or flowing into hills and mountains — water goes down and not up — or just stopping dead in the middle of nowhere. Deserts and swamps need a buffer between them. And mountains rarely just rise out of the ground. They’ve usually got foothills.
If you notice something weird, trust your gut and fix it. Do not ignore it or try to explain it with magic. That’ll backfire nine times out of ten. Trust me. Leave the fantasy for the POI Layer.
Tip 9: Above All, Relax
This map-making s$&% can be a nice, fun, low-pressure activity. It’s just about the only time you can’t ruin absolutely everything with one typo or poor design choice. So grab a cup of your favorite adult beverage, put some music on, gather some special markers and fancy paper, put your phone on leave me the f$&% alone mode, and cloister yourself away for some cathartic cartographic chill-time.
That’s what I do.
Speaking of…
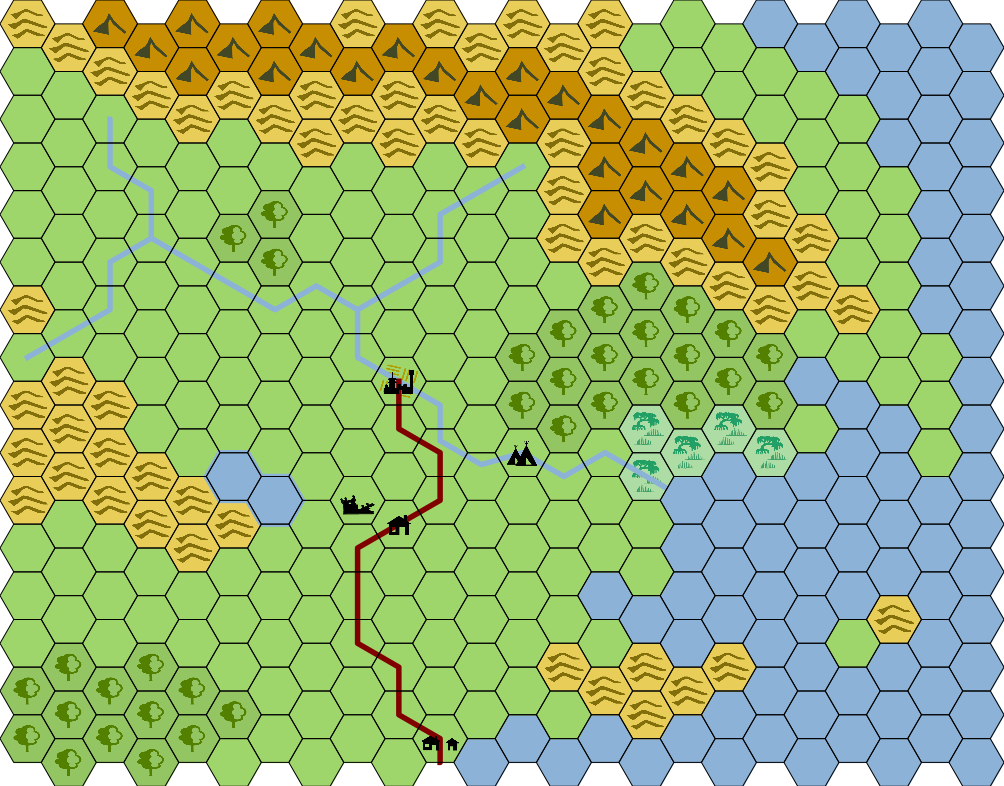
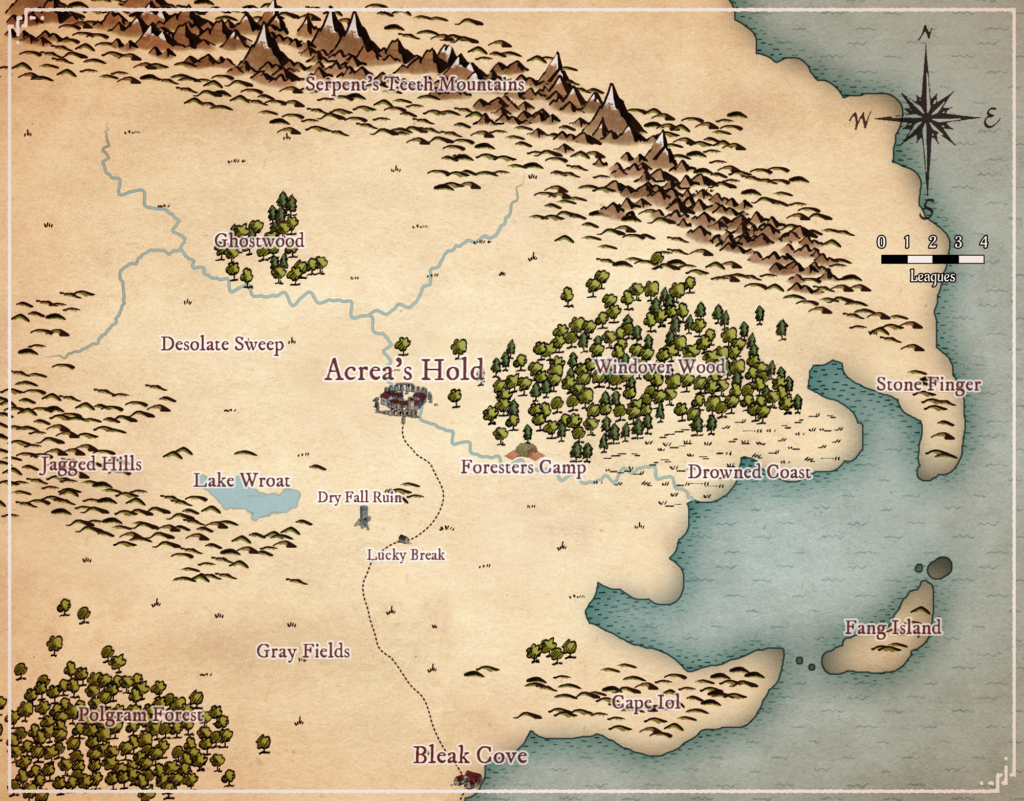
The Adventuring Adventurers Who Have Adventures Starter Region
Here’s what I came up with for the running example. And it doesn’t need a lot of explanation. Note that I incorporated the following facts:
- First Adventure Facts
- Roadside inn a couple of days from Town
- Orcs camped in ruins near roadside inn
- Facts from Town
- Someplace called Lake Wroat
- Someplace called Windover Wood
- Someplace called Gray Fields
- Someplace called Jagged Hills
Also note that I used Worldographer for the GM’s Regional Map and Wonderdraft for the Players’ Regional Map. Also note that I’ve never f$&%ing used Wonderdraft before and used a bunch of default assets to get this s$&% done as quickly as possible.
And note that’s because I just discovered, literally two hours before posting this article, that I forgot to actually make any example maps.
Which just goes to show that I don’t ask you to do anything I ain’t willing to do myself.
Nice! Makes me want to start a new campaign.
Thank you Angry!
I love-love-LOVE mapping, but I always end up getting so f$&%ing INVOLVED in the little details. Pen & paper, I’ll draw-and-erase draw-and-erase over and over. Move this blob of hills like a half-inch to the left or a quarter-inch down…and that’s just the rough first draft!
“If you chill the f$&% out, you can just enjoy this s$&%.” is what I needed to hear (well, read)
You’re right, I’m sabotaging my own fun, in the name of (shudder) precision!
Of course, the other advantage of a map that fits on a standard sheet of paper is that you can ignore all the geographical accuracy stuff. Why is it like that? Stuff that’s off this tiny little page.
Could have done this advice a month ago when I made a map which was, frankly, terrible, though still better than my GMing skills? Oh well, it’s not like making maps is a chore.
You say it’s utterly stupid, I say it’s utterly exciting, especially when you consider how magic effects the planet. Spells can move continents and create eternal storms. $h!^’s cool. The only problem is your not building a world to put on reddit, your drawing a hecking map for a game of make-believe elves. (The general you, not the specific one)
I heard of 6.0 mile hexagons only recently, considering you’re also talking about them, I really should look more into them, as a math nerd I love hexagons with nice numbers divisible by a lot of other numbers.
The math is basically magical.
Great advice. Reminds me that I need to work on mine.
Added to the Blog Database.
https://jonbupp.wordpress.com/blog-database/for-dungeon-masters/world-building/