
Happy Megadungeon Monday!
Let’s talk about maps. As I mentioned last week in my preview of this week’s article, I’ve been using some new mapping software. And one of the things that that software allows me to do is to build up the dungeon map as a series of layers. Basically, think of transparent overlays. Now, I don’t want to discuss the technical details of the tools I’m using more than I have to. But this illustrates an important point: there’s lots of ways to map an adventure. Especially a complex adventure.
Remember that every adventure is a dungeon. That is, every adventure can be depicted as a map of interconnected scenes, encounters, and events. The players will wander from scene to scene, exploring, encountering, and engaging. As they do so, they will uncover new paths or find ways to unlock paths they couldn’t access before. It doesn’t matter whether those are literal hallways and locked doors or rather are clues and leads and bits of evidence in a murder investigation. It’s all the same. In fact, the dirty secret is that the easiest way to plan a nice, non-linear, open murder mystery is to plan it like a dungeon. I s$&% you not.
Now, a map is just a visual representation of the connections between a bunch of different things. We tend to think of a map as just a depiction of a physical space – or as a figurative space you can move through, as in a murder mystery – but that’s not entirely what a map is. Consider your murder mystery again. How many different maps could exist for that adventure? Well, you could have one map that shows the scenes and encounters. For example, the scene of the crime might have three “exits.” One is the dagger that has a specific blacksmith’s stamp on it. That exit leads to the scene talking to the blacksmith. A second exit might be just the identity of the victim, which leads to the victim’s house, which can be searched for clues. The third might be a prominent window across the street from the scene from which a nosy neighbor is watching. That exit leads to interrogating that potential witness. Right?
But you could also have a map of the physical space, the city itself. After all, each scene is going to take place somewhere in the city. And each neighborhood will have its own character that will aid in descriptions and may also define random events that might take place while the characters are wandering those particular streets. That map will also describe how long it will take to move from scene to scene. That’s useful if there’s a ticking clock or if there are events that will take place at a certain time.
Then, there are also tactical maps. Tactical maps are floorplans or schematics of individual spaces that are necessary to play out particular scenes. Think combat maps. But a stealth or infiltration scene could also require a tactical map. You’ll need tactical maps for every place in which a scene might require precision positioning and movement. And you might need a few for random scenes and events. Normally, we think of tactical maps as part of the physical space map. And that’s fine. But, realistically, they don’t have to be.
But other maps are also possible. For example, in a murder mystery with lots of characters – or any adventure with a lot of NPCS – you might have a map that shows the relationships between the characters. Each character would have a node on the map. Lines would connect them with things like “works for” or “secretly works for” or “loves” or “hates” or “rivalry” or “owes a debt” or whatever. As another example, imagine an adventure in which a villain is trying to execute a complex, multi-part plan. A map of the different steps in that plan – one that shows which steps are dependent on which other steps – could be quite useful.
The point is, complex adventures involve lots of different relationships between lots of different types of information. And those relationships can be depicted with maps. That’s probably not a huge revelation.
But it’s also important to recognize that different types of maps are useful to different people in the game. Some maps, for example, are very useful to people running the game. A GM trying to portray a whole bunch of NPCs would benefit from a map of the NPCs. Some maps are useful to people playing the game. The players definitely benefit from seeing tactical maps, which helps them make good decisions in complex combat situations. And some maps are useful to the person designing the game. For example, the person planning a giant megadungeon adventure definitely benefits from a map of the critical path through the adventure.
Now, we could analyze the different types of maps their importance to GMs, players, and designers. We could, for example, discuss how tactical maps are useful for both players and GMs to facilitate the playing and running of encounters. We could discuss how physical space maps are generally useful for the GM, but that the players don’t generally see those maps. Instead, the GM gives the necessary information from the physical space map narratively to the players. However, players can produce their own physical space maps if they need to. But we’re only concerned right now with our role as designers.
As it turns out, from a design standpoint, there are two types of maps. Maps that help the designer DESIGN the adventure and maps that are part of the design and help the users RUN and PLAY the adventure. Take, for example, the tactical maps. Now, tactical maps are useful for GMs and players. But the designers don’t NEED tactical maps as part of the adventure design. They are maps the designers produce specifically for the GMs and the players. On the other hand, the critical path map is something the designer definitely needs. It helps them figure out where to place encounters and plot points and all of that crap. But it’s really only useful as a design tool. GMs really won’t benefit from knowing the optimal path any given group COULD take through the dungeon. Instead, they need to be able to follow their party’s ACTUAL path.
That isn’t to say the critical path isn’t worked into the design in ways the GM could benefit from. For instance, when building the encounter key and deciding what order to present the different levels of the dungeon, the critical path is immensely important. But that’s part of the design and presentation. And if that’s done well, the GM never actually needs to see a map with a line on it that says “this is the minimum, optimal path through the dungeon.”
What’s the point of all of this? Well, partly, I want you to think about all of the different types of maps you could use. I want you to distinguish between the maps that are design tools from the maps that present information to the audience. And I want you to think of a map as just a way of visually presenting information. And when it comes to a an adventure that is also a dungeon, I want you to think of the various maps as being layered on top of one another.
The Maps of the Megadungeon
To figure out what maps our Megadungeon needs – and I mean both design maps and presentation maps – it’s important to figure out what information we need to organize, present, and share. And, without explicitly discussing it, we’ve already been doing exactly that. Now, we’re going to explicitly discuss it. First, let’s talk about the information that makes up our Megadungeon adventure.
Our dungeon is a dungeon. Big shocker, right? I know! As a dungeon, that means that the adventure IS the physical space. Players will navigate from scene to scene by navigating from location to location. Thus, our dungeon is divided into encounter areas. We’ve defined an encounter area as a space in which a scene or encounter can take place. They will be the numbered locations on the maps. Right? They won’t necessarily be single rooms. We can certainly envision an encounter space that encompasses a few rooms. Imagine, for example, a bedroom suite – a front room, bedroom, and a bath room. Those three rooms are packed tightly together and easy to move between. And events in one room will probably be heard from other rooms. If you get into a fight in the bedroom, the orc lurking in the bathroom will hear the fracas and come join in.
Now, the encounter areas themselves are connected to each other in various ways. And those various connections, we’ve decided, will work to guide the plot of the game. That is to say, the connections between encounter areas will only be accessible at certain points in the story. Thus, we can keep the players from entering an encounter area before our plot progression says they should, even if there is a path from the encounter area they are in to the one we don’t want them to be in.
Now, for simplicity, we’ve grouped our encounter areas up based on the plot point at which they become accessible. But we also need to worry about gamey things like level progression, encounter difficulty, and how many encounters will occur between rest periods. Thus, we grouped our encounter areas by adventure day.
Ultimately, that led to this map. It is divided into encounter areas. Those are the black squares. It is color coded, to show which encounters are accessible based on which pre-requisites. And it is further subdivided into days of adventure, each of which contains between eight and twelve encounter areas which provide us enough space to have the proper number of encounters in each day.
I’m limiting the discussion to just talking about the second level of the dungeon. The main level. We’ll eventually look at all of the levels. But we’re just trying to organize our data here. So, one level is all we need.
Now, the thing is, we know that we have way more encounter spaces than we need. We did that on purpose because we want to have some empty space in the dungeon. And because we also have a mix of vital, required encounters and optional, side encounters. We also know that the players have to reach certain objectives to advance through the story and to open up further areas of the dungeon. And that led us to design a critical path. That is, we were able to draw a path through the dungeon that would carry the players through the right number of required encounters and to each and every required objective. More or less.
That led us to add another layer to the map that already had encounter spaces, colors, and days. That layer was the critical path.

Now, we also have one piece of information. We’ve divided our dungeon into physical regions. And we know we want to create a sense of connection between the encounter areas in a region. That is, each region should feel unified in terms of its architecture, design, features, hazards, and obstacles. And those regions – eight in total – each spread across multiple days of adventure. And we did that for…
Digression: Burying the Track
Actually, I don’t think I ever discussed this. So, while we’re discussing the information that makes up our dungeon, now is a good time to discuss the logic behind that decisions. Why are there fewer regions than days? And why does our adventure criss-cross back and forth between the regions? Well, it’s part of a psychological trick, to be honest. It’s one of the many things we’re doing to bury the railroad tracks.
Look, you and I know this adventure is very carefully designed to play in a mostly specific way. The adventure is actually on rails. It’s actually a linear adventure with a bunch of optional offshoots. Now, that is absolutely necessary. Why? First of all, because D&D is built around mechanical advancement and mechanical difficulty progression. That is to say, as they play the game, the characters – not the players – become more powerful in concrete, mechanical ways. And as they do so, the obstacles they encounter also become more difficult in concrete, mechanical ways. The fact of the game is that players cannot wander freely wherever they wish into whatever encounters they wish if the game is to remain fair. Normally, an adventure spans a very narrow band of power levels. So, there’s no danger the players will wander so far off the progression that they will encounter something too powerfully unfair. But our adventure spans between ten and thirteen experience levels. So, we need rails to ensure the game follows a fair – and ENJOYABLE – power level and difficulty progression.
By the way, the relationship between the difficulty of the game and the players’ and characters’ abilities to cope with that difficult is called flow. Flow is a sweet spot between a boring game and frustrating one. It’s a central design concept.
Anyway, the other reason for the rails in this adventure has nothing to do with the fun of playing a game. It actually has to do with the game as a story. A good story, a satisfying story, has a certain structure to it. Tension wobbles up and down. Characters have victories and suffer setbacks. Stakes rise. Future events are foreshadowed. Mysteries begin to make sense. Questions are posed before they are answered. And so on.
Story structure is an underappreciated aspect of running good RPG sessions. Most people think good stories simply emerge from people having the total freedom to do whatever they want. But mostly, those stories are bland and what gets remembered are individual moments that stand out. Rarely does the story as a whole resonate with players unless the GM is good at crafting a well-told story.
So, our adventure is structured so that it will follow an enjoyable progression and so that it will tell a satisfying story. Admittedly, it isn’t f$&%ing Shakespeare. It’s still just a dungeon with a demon at the bottom. But it should be well paced, with wobbling tension and rising stakes, without any extra effort from a GM.
The rails are a good thing. But we don’t want the players to see the rails. A sense of agency is extremely important in a role-playing game. The players have to feel like they have control over the story, especially over the outcome, or else they don’t feel like their choices matter. Now, in some sense, their choices do matter. The players’ choices do determine how much of the backstory they discover and whether they have to struggle against the demon queen at level 11 or can trounce her at level 13. We’ve built in lots of optional content specifically to ensure no two groups will have precisely the same experience.
But that isn’t always enough. Consider, for example, Final Fantasy XIII. That game has been referred to derogatorily as “one long corridor” precisely because the game is not only excruciatingly linear, but it is obviously so. Most of the Final Fantasy games are quite linear. You have to follow the story progression. But you are also free to wander around an open map, have random encounters, and discover hidden treasures and optional objectives. Moreover, the maps aren’t designed as corridors from beginning to end. They loop on in themselves and criss-cross and have lots of side paths and dead ends.
And that leads us to this: if each day took place in its own geographical region, each one with its own hazards and foes and obstacles and whatnot, the rails would quickly become obvious. The players would recognize they were in a corridor. Or rather, on an assembly line. But because we’re criss-crossing back and forth across a few different regions and those regions are interconnected with all sorts of side paths and filled with optional spaces and hidden treasuries and discoveries, we’re burying the rails. The game will seem open and free.
Anyway, back to our map layers…
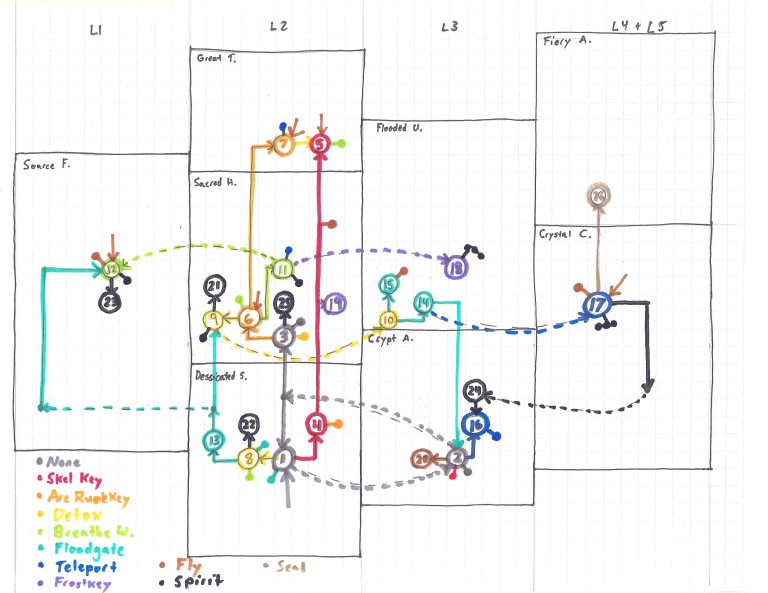
Where was I? Oh yeah. The regions. We divided our Megadungeon into geographical regions and decided roughly where the different days of adventure would take place. But we haven’t really put that information on the map yet except in a vague sense of proximities and vertical levels. The best depiction is probably this flow chart of the adventure from way, WAY back.
So, we have days of adventure, a critical path, the encounter spaces, a plot progression, and the regions and levels. Those are all our design tools. Those are the maps we need to build the adventure.
In theory, we COULD design the adventure here without any further mapping. I mean, old-school adventure modules stopped here quite frequently. You have a map of the encounter spaces, each of which was numbered and keyed. The keyed descriptions described what was in that location and that was that. Honestly, we mostly HAVE a physical space map already designed. We just need to finish a couple of details.
But we’d be selling our adventure short for a few reasons. First of all, maps are a great way to present extra information and save on word count. I could spend a sentence describing a lake in a certain room, or I could simply draw it on a map. That way, the GM can tell, at a glance, the gross physical features in the room. Second of all, maps are nice and people like maps. Lots of people – self included – buy adventures on the strength of their maps alone. I s$&% you not. I’m pretty sure – for the D&D crowd – on average, maps sell more adventures than artwork does. Third of all, D&D is built around tactical combat and that means D&D needs precise maps. Most people play D&D as intended, using gridded maps and tokens of some kind. And even if they don’t, the GMs who try to play “gridless” – which isn’t actually a thing, but they like to say that – they rely on the map to keep track of things.
The point is, at the very least, our Megadungeon is going to need two types of presentation maps. First, it’s going to need physical space maps that describe the whole space and how it is laid out and where all the rooms and locations are and how far they are from each other and all of the geographical features. Second, it’s going to need tactical maps for each of the encounter areas.
And that brings us around to our current step in the design, which will encompass this article and the next article. We need to compress all of our design information down to one single map and then use that map as the base layer for designing the physical map. And as we design the physical map, which we’ll be doing in stages over the next several weeks while we also work on other bits of design, we’re also going to be designing tactical maps. That is, our physical map will also be all of our tactical maps.
Now, building the base for the actual map may sound like a bunch of boring rehashing of the work we’ve already done. But, it won’t be. Because in compressing the information into one map, we’re going to have to make some of the most important design decisions we’ll be making in this entire project. But we’ll get there in a second.
A Quick Note on Presentation
Note that, at this point, we’re still not thinking too hard about how the final cartography will look in the physical product. We’re building the master map of the dungeon. Eventually, we’ll have to decide whether it will be presented as a giant poster map or a series of smaller maps with callouts and references or as a flowchart with the tactical maps on the pages describing the encounters. What we’re doing now is designing the master map which we can cut up later however want to. Okay? Cool.
So…
Too Many Colors in Too Few Places
Right now, there’s two bits of information missing from what we might call our master design map. The first thing that’s missing is where the regions are. And fixing that will lead us to the second bit of missing information. That second bit, by the way, is the big one that will demand a lot of attention on a very, very small scale.
See, every encounter space is part of a day of adventure. But it’s also part of a specific region. But its accessibility may also be limited by a certain prerequisite. To design our dungeon, we need all of that information. The trouble is visualizing it all can be kind of tricky. Especially because, on top of all of that, we’re going to need to see our critical path.
But there’s something else missing from all of this. Our encounter map is nifty and all. But it’s just boxes. And our critical path just shows a path through most of the boxes. What it doesn’t show is how to get into the optional boxes. And it doesn’t show alternate paths. And it doesn’t show any of those shortcuts we’ve been so keen on including.
What we need to do is build an Exit Map.
The Exit Map
An exit map shows the connection between the different scenes, encounters, or locations in an adventure. Now, that might SOUND like it’s just a physical map. And, it does FEED the physical map in adventures where the location IS the adventure (like a dungeon). But an exit map is MORE than just a physical map. See, an exit map doesn’t just say “this space is connected to that space” or “you can get from this scene to that scene.” It also spells out what is REQUIRED to move from space to space or scene to scene.
Using a mystery adventure as the example again, the connection between the “crime scene” and the “blacksmith who made the murder weapon” isn’t just a line. It’s a line that notes that the lead comes from the knife and from noticing the mark on it. That way, when you’re designing the “crime scene” scene, you can include something like “an Wisdom (Perception) check (DC 15) will turn up the knife that was used as a murder weapon. Any examination will yield the blacksmith’s mark. The players can ask around to trace the mark to Bob’s Blacksmithery on Black Street.”
Now, for a location-based adventure like a dungeon, the exit map is generally much less informative. Basically, it shows “there’s a door between these rooms” and stops there. So, basically, it IS the physical map. Now, of course, exit maps do include more information sometimes. Some doors are secret doors, for example, and some doors are locked. But ours is no simple dungeon.
First of all, the accessibility prerequisites we’re building into our dungeon – you know, like the arcane key and the floodgate and the death of the poison-spewing plant monster – those prerequisites are actually NOT qualities of the encounter spaces. I mean, they are. A certain space should only be accessible if its prerequisites are met. But it’s not the encounter space that will stop the players. It’s the locked door. Or the flooded passage. Or the thick bramblewood vines choking the passage and spewing highly toxic vapors.
Second of all, we’re designing this adventure to carefully nudge the players in the right directions even when there are no hard gates. We want them to notice certain things. We want them to choose one place over another when they have the option. We want them to remember certain things exist. We’re not merely building an open space to explore, we’re not merely building a space that blocks off some passages until you have the right key, we’re building a space that nudges the players along the right path, that helps them map it, that helps them keep track of everything, and helps them feel as if their exploration is empowering them to win.
Those things are going to be strongly influenced by our exit map and they are going to rely on some pretty subtle psychological nudges built into the traffic pattern of our game. And the techniques we’re going to use are actually techniques you can use in any adventure – simple or complex, dungeon or event, open or linear or linear-pretending-to-be-open.
And most of that work will be done in the next article. But for now, we’re going to look at some of the very basics.
Setting Up for the Exit Map
In order to set this project up, I set up four master map files in Campaign Cartographer 3 Plus. I won’t discuss the technical details of the software here. But I will say each of those files represents one level of the dungeon. And we’re going to be starting with the main level. Level two. That’s the level with the dungeon’s main entrance, the Desiccated Sanctuary, the Sacred Halls, and the Great Tree. I set the map completely to scale – the equivalent of drawing it on graph paper. I decided that each encounter space is 15 D&D squares by 15 D&D squares. Since there’s five feet to a square in D&D, that means each encounter space is 75 feet by 75 feet.
I arrived at that number with the basic understanding that a given encounter area needs space for five PCs, anywhere between one and ten monsters, and plenty of space to maneuver. Basically, the needs were roughly the same as 4th Edition D&D. In 4th Edition, encounter areas ranged from 8 squares on a side to 12 squares on a side. I went with 15 on a side to leave room for hallways connected the spaces and to account for irregular spaces. I don’t just want a bunch of square rooms and I want some space between encounter areas.
The reason the scaling is important is because this map will end up being the physical and tactical map for the dungeon when it’s done. I’ll be drawing the actual dungeon map directly over this template.
Next, I decided where the regions would be. I already had a pretty good idea, so this required very little thought. And I will talk more about some of the specifics of the thought process as we start filling in the exits.
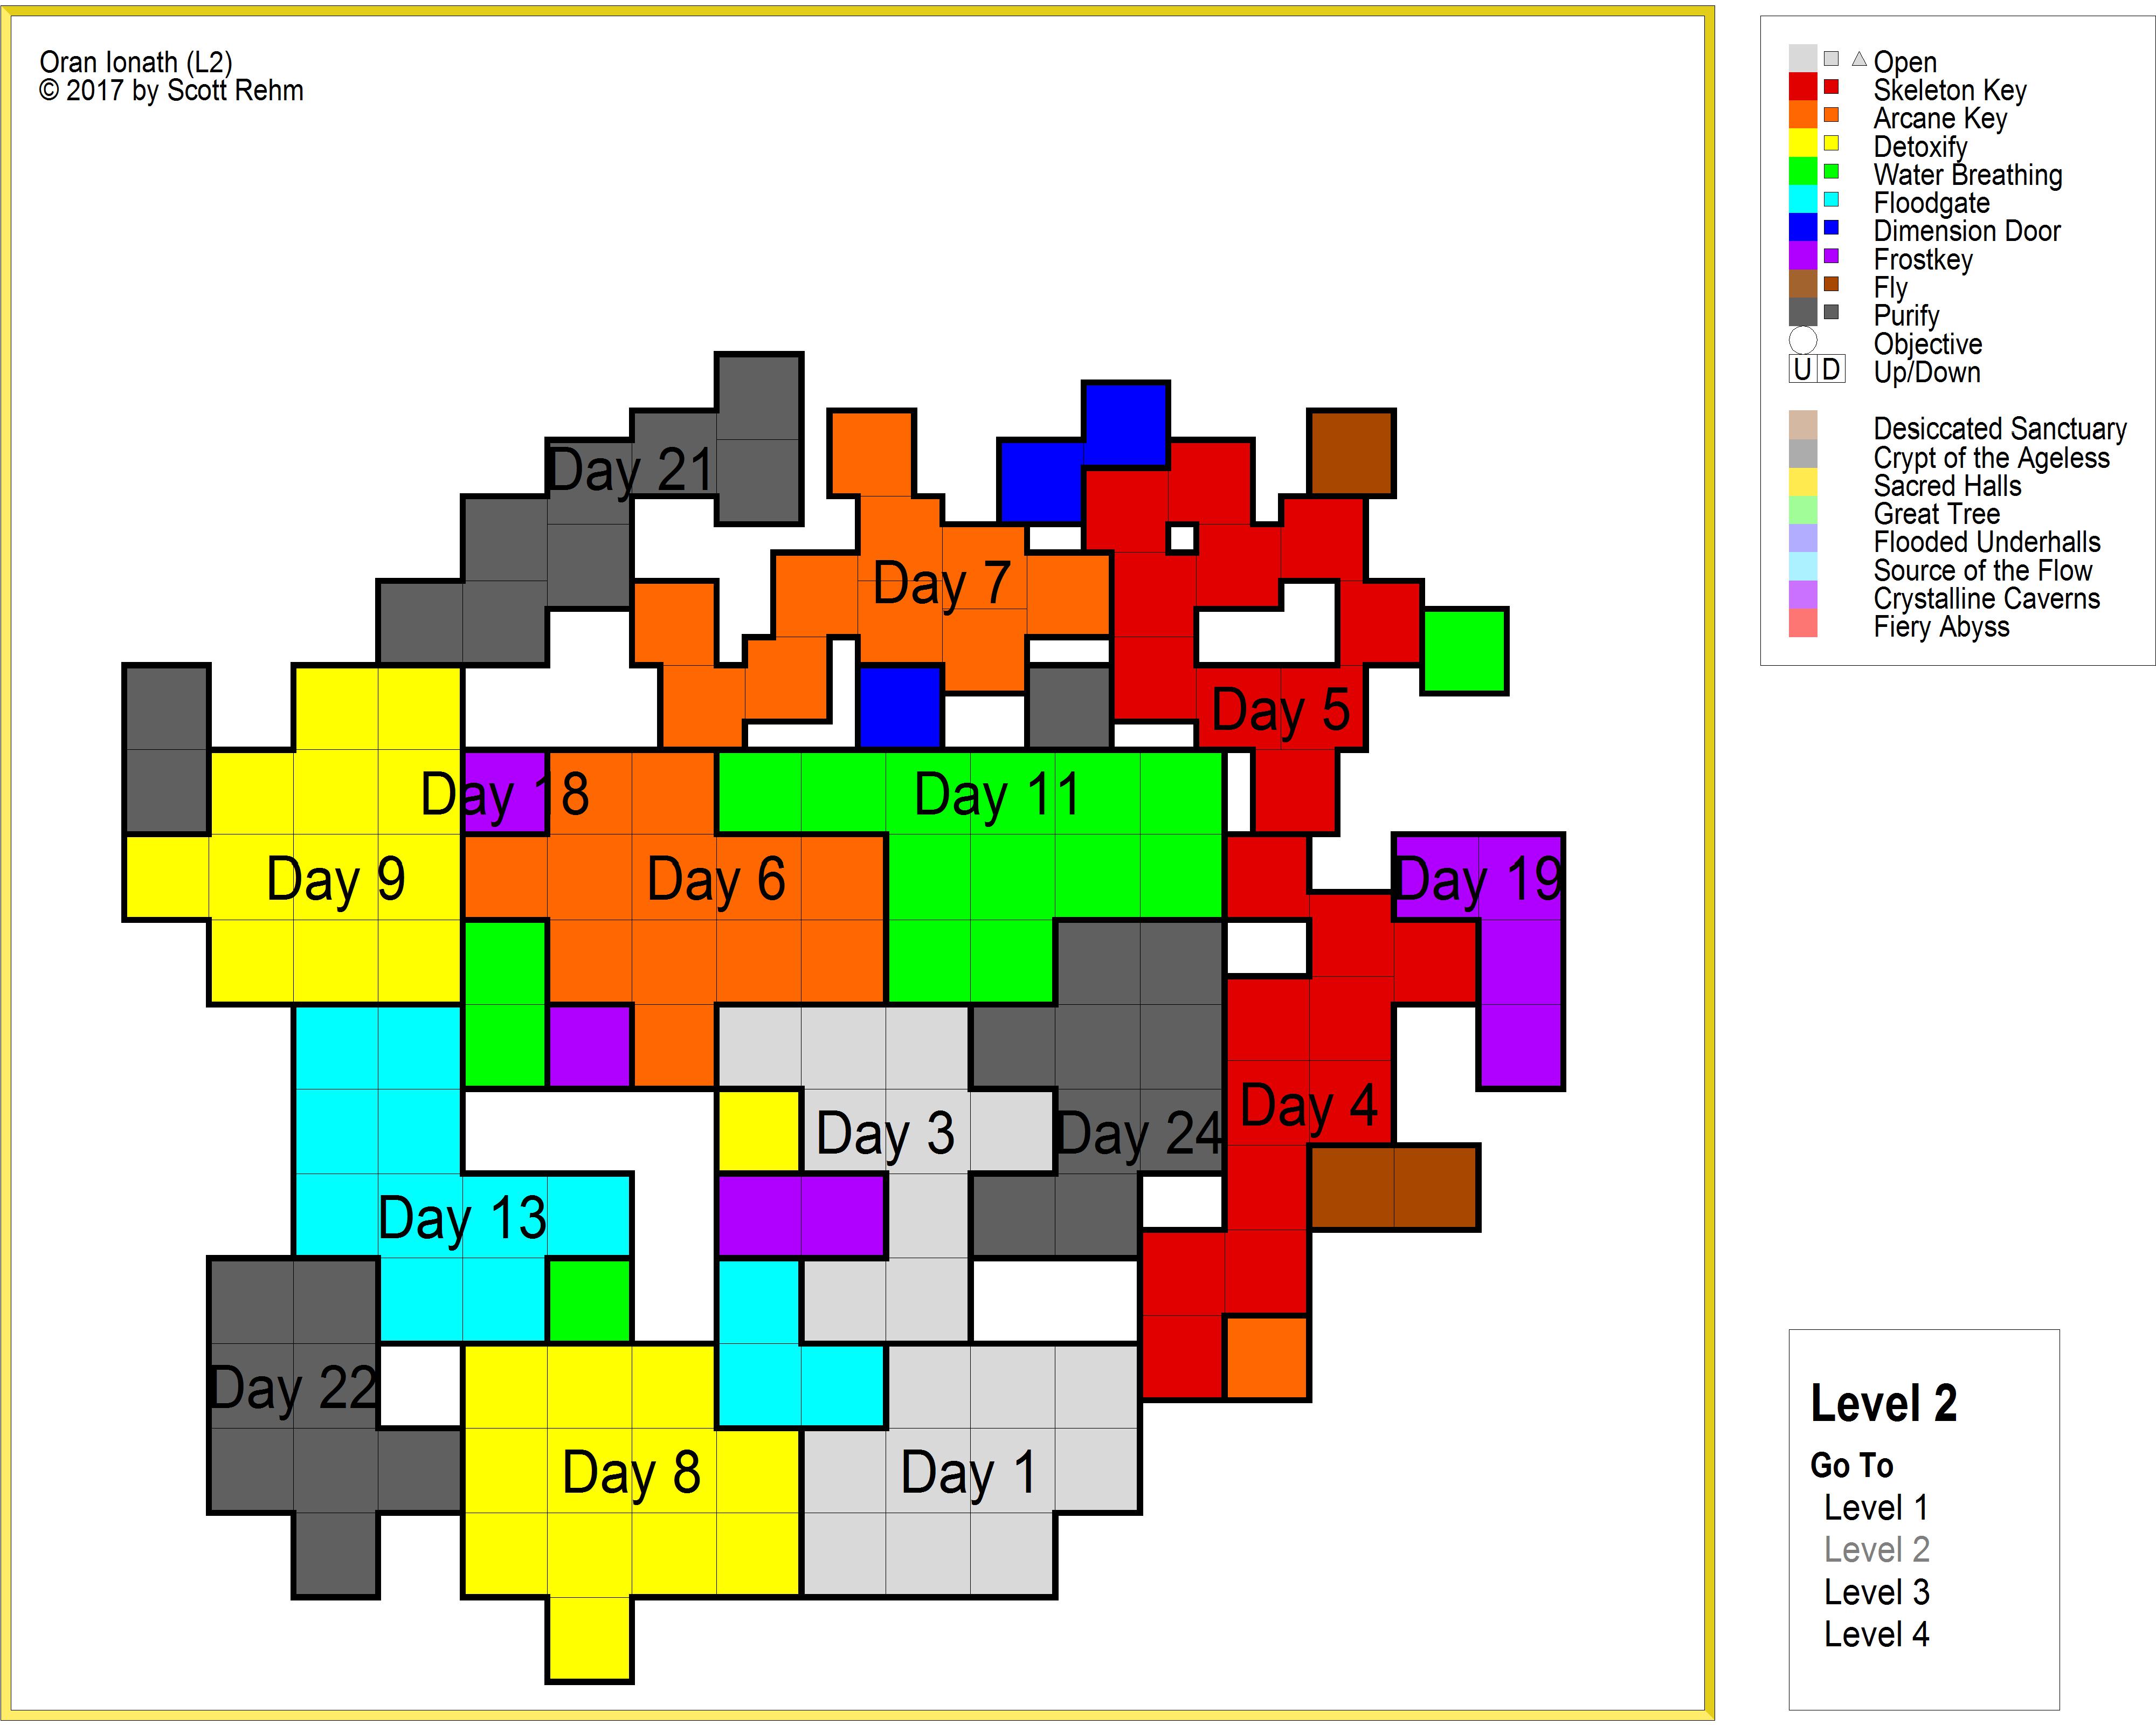
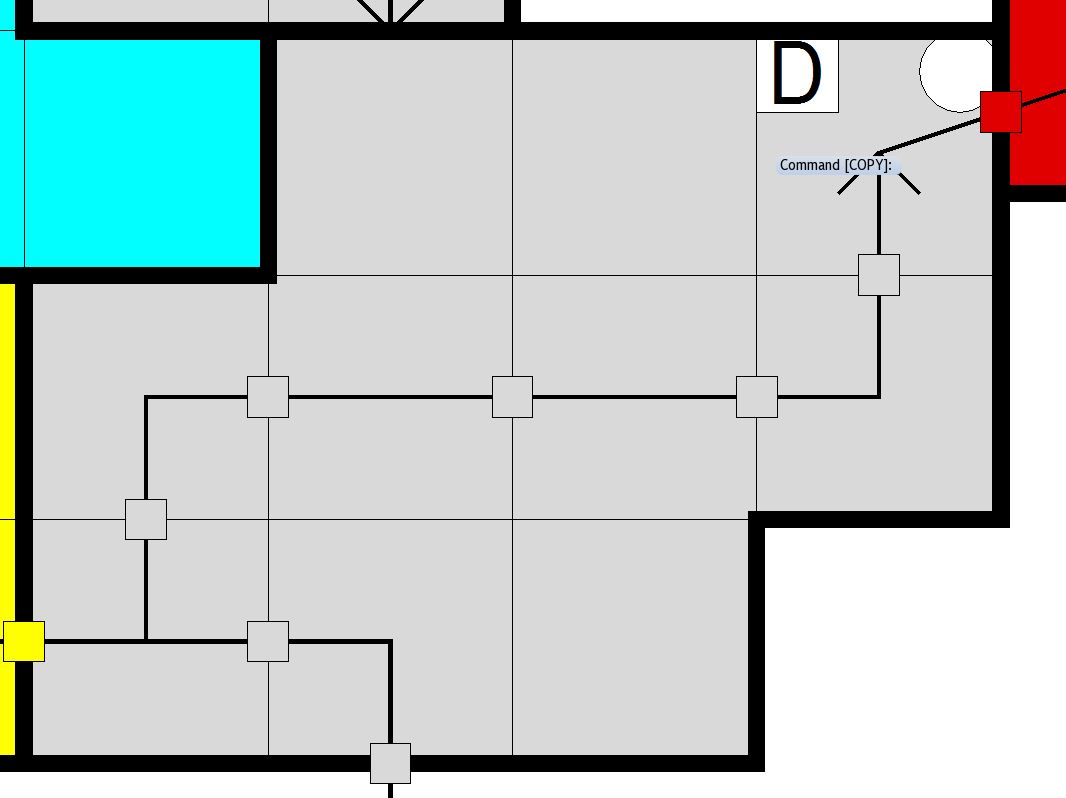
Long story short, the starting point for the exit map is this puppy here:
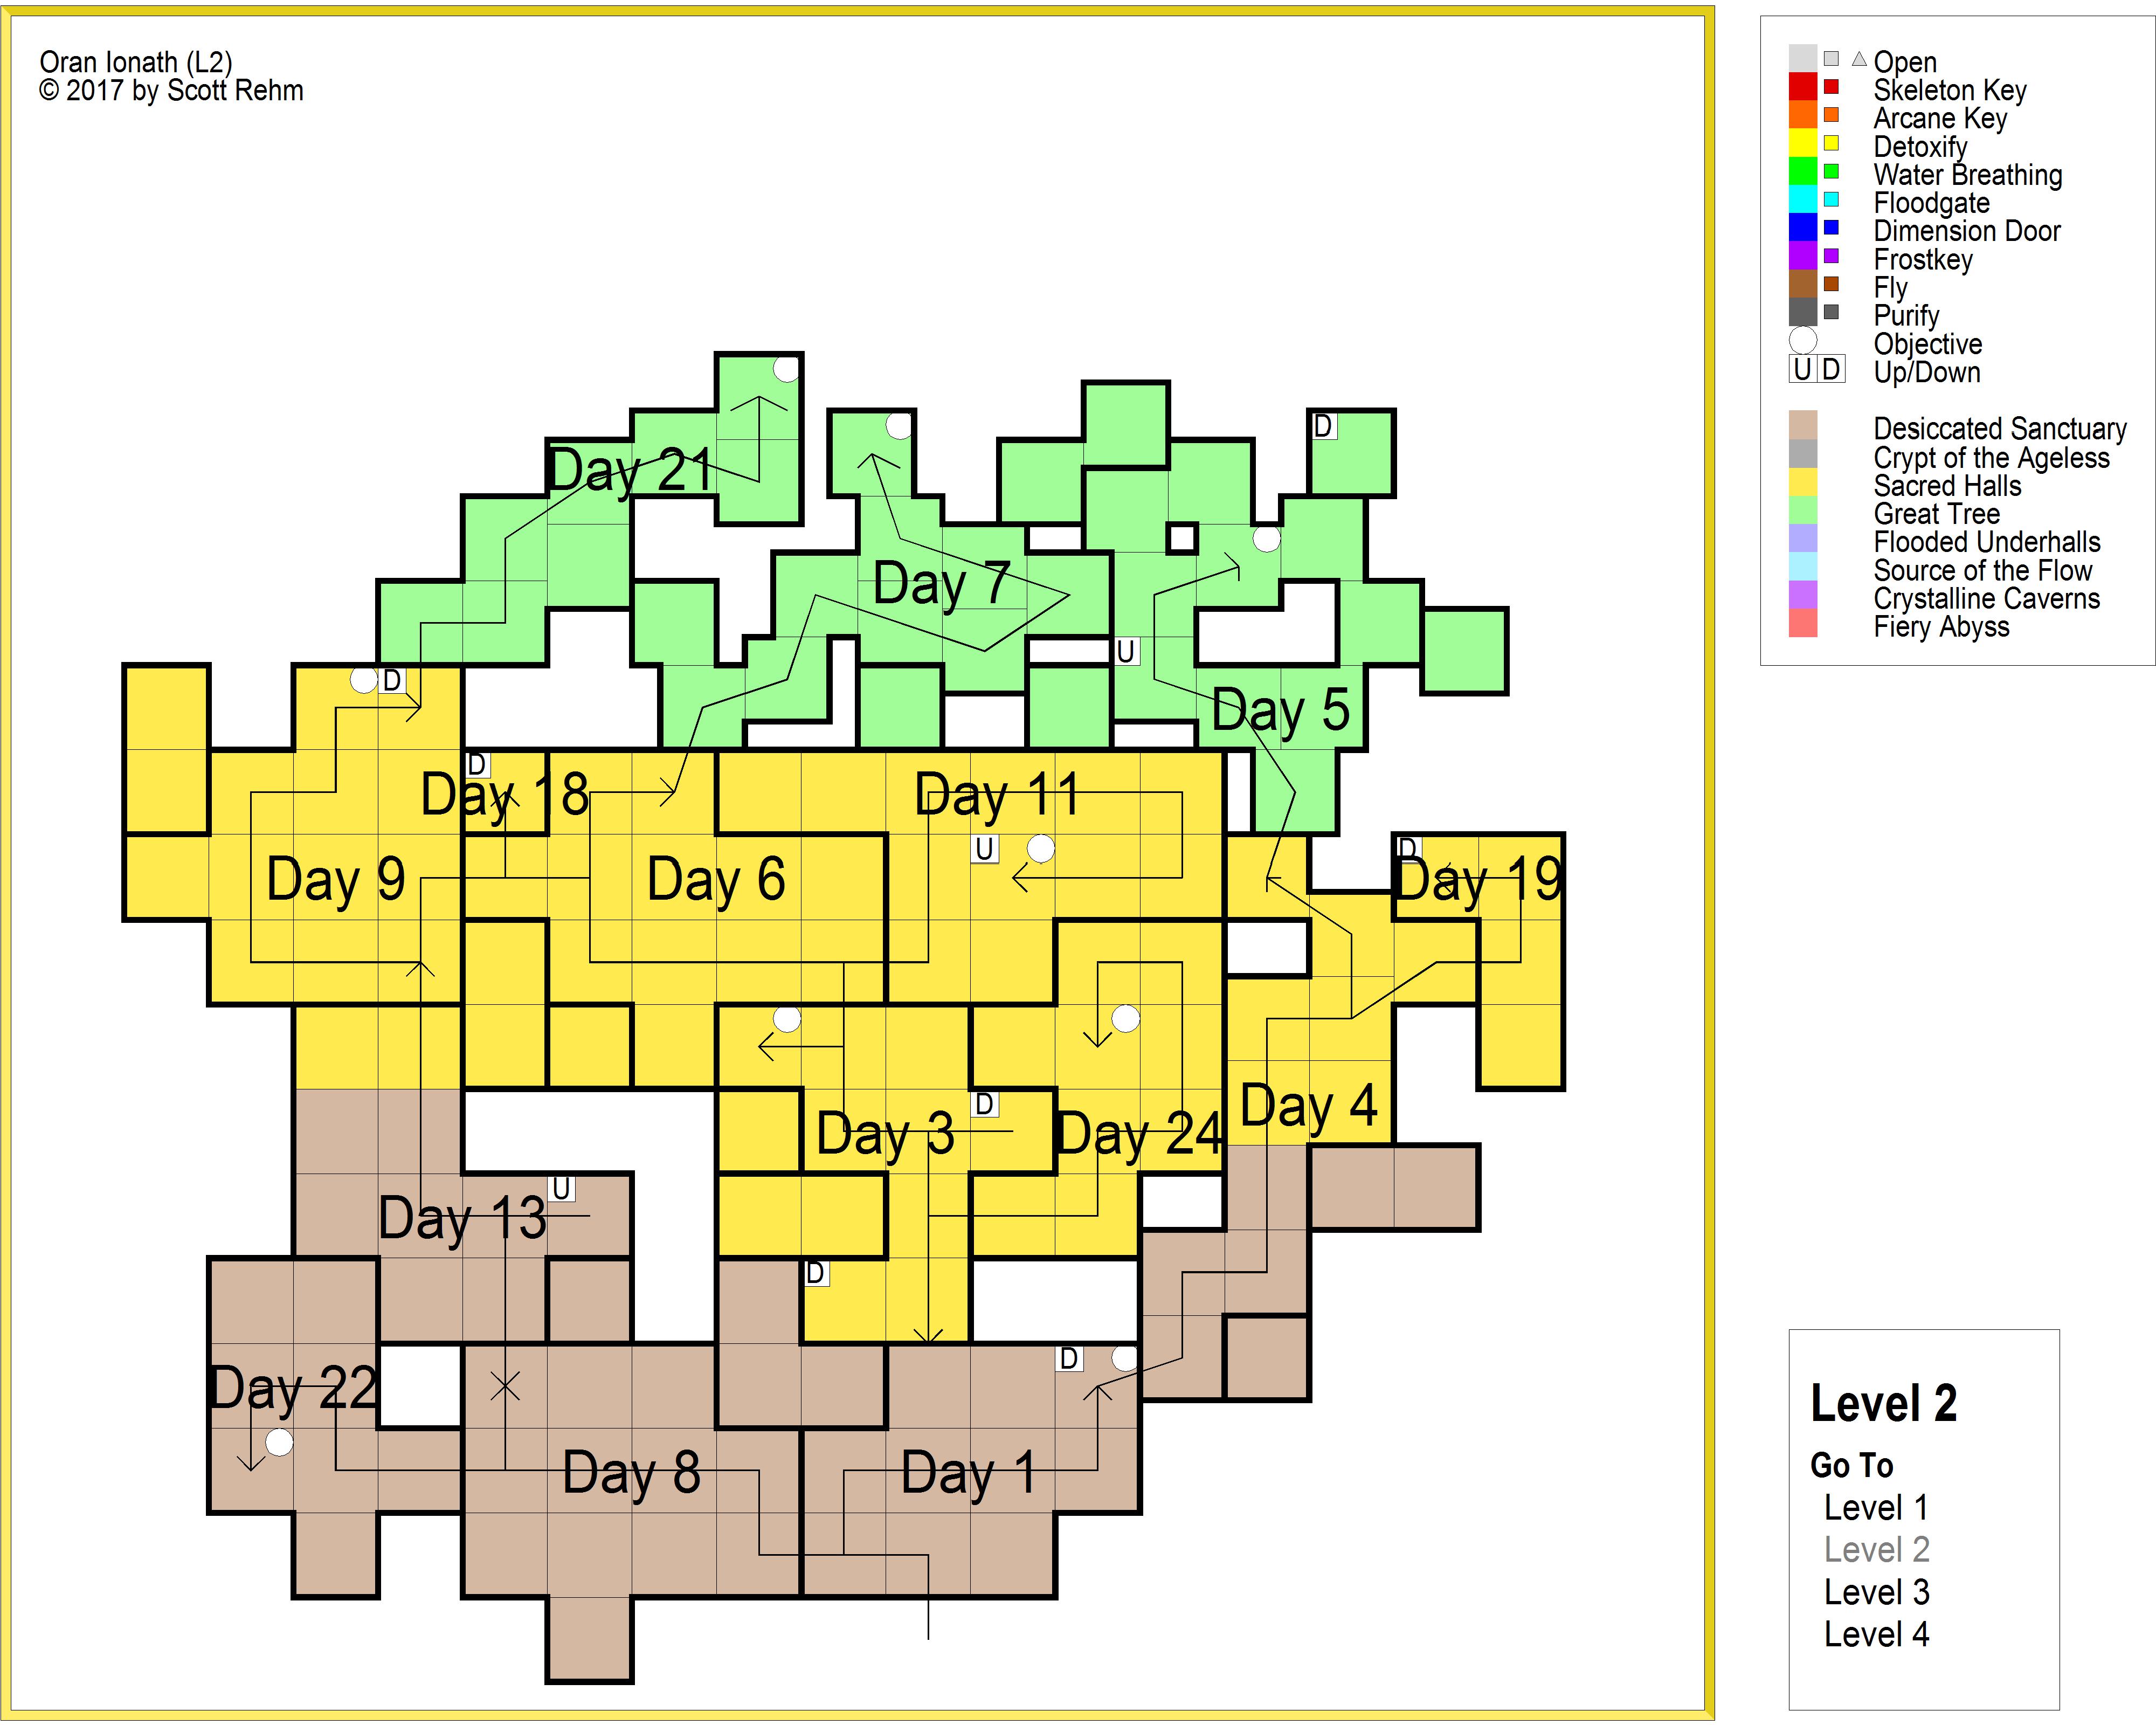
Right now, it has two different color-coded underlays. I can switch between the regional color-coding above, or the color-coding by the prerequisite for access as shown here:
So, what IS the actual exit information? Well, right now, I just need to show the connections between the different encounter spaces. And color code them depending on the tool needed to get through. You can see there’s already a key in the upper right.
To end this article on a high, let’s see a very simple example of how this process works. Let’s put down the exits in Day 1.
Day 1 Exit Map: First Pass
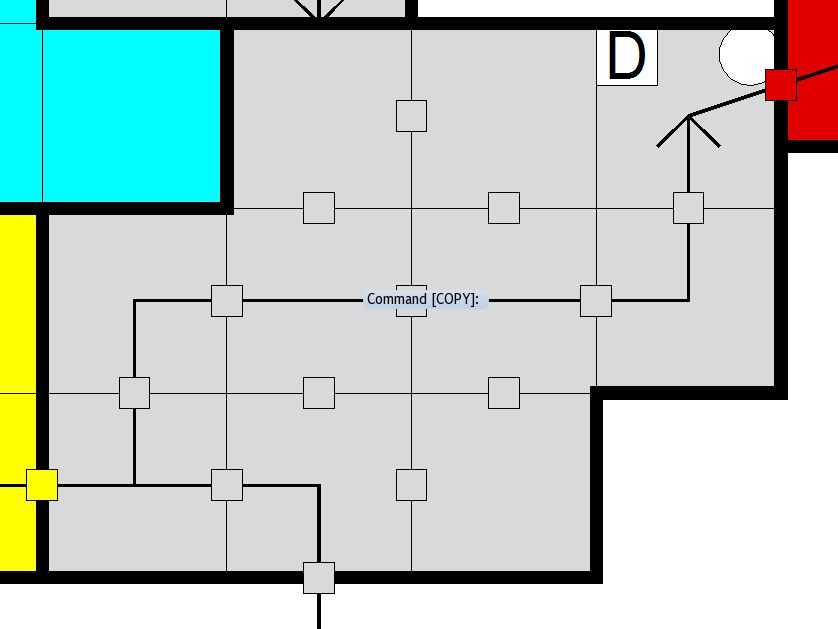
Here we have Day 1:

Forgive me for using screen captures instead of exports. It’s just easier. As you can see, I’m working with the color coding for prerequisites right now. The light gray color indicates areas accessible from the very beginning.
Now, I’m going to adopt the same color-coding for exits. An exit will have a color, indicating the prerequisite for passing through that exit. But, keep in mind that I’m not designing too much about the exits yet. In the end, a light gray door might indicate an actual door or it might be an open hallway or passage. It might even indicate a door that is locked but that is pickable or breakable by a character of any level. As we mentioned a long time ago, having some doors like that will be important. But that’s a decision we’ll make when we actually design the individual encounter spaces. The point is, right now, there are no PLOT PREREQUISITES for opening the light gray doors.
We have a critical path running through Day 1. Now, we’re going to have a lot more to say about the critical path next week when we put down every last exit in every corner of the dungeon, so I’m going to save that discussion. Right now, it’s just important to understand that the party should be able to follow the critical path. And that means, I need exits along the critical path. Like so:
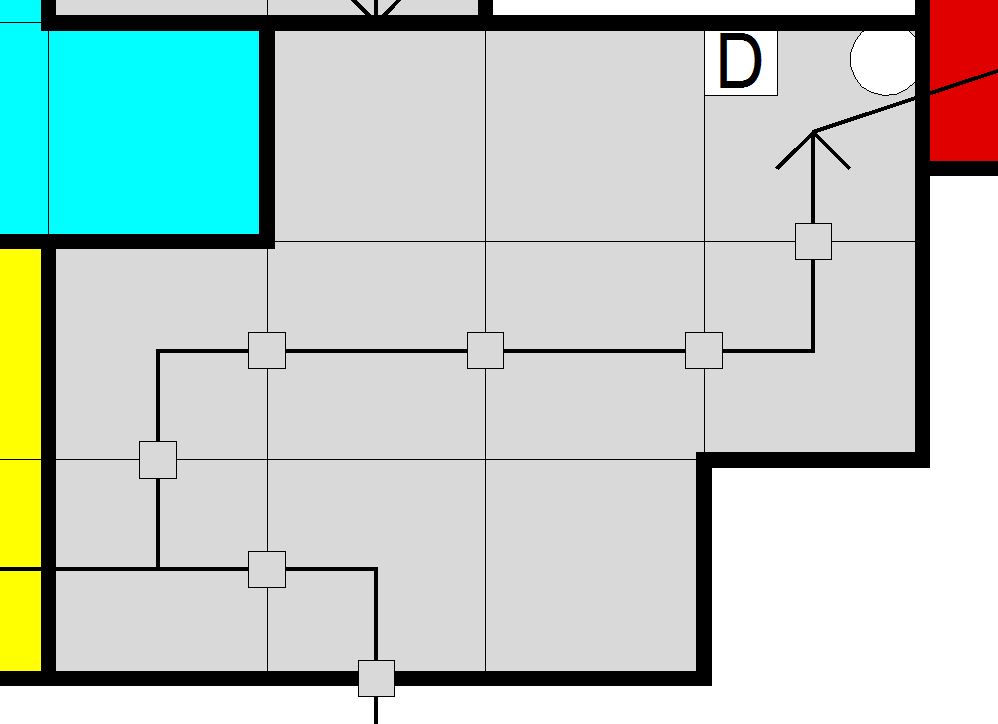
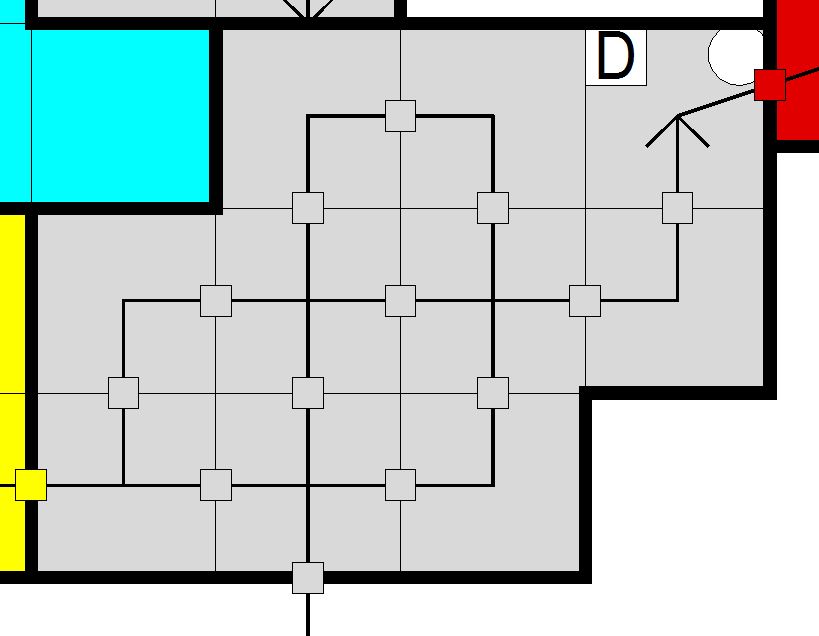
Now, that connects up most of the rooms in Day 1. But the critical path leaves Day 1 in two places. In the lower left, it leaves for Day 8, which requires the players to have killed the poison plant monster. In the upper right, it leaves for Day 4 which requires the Skeleton Key. We place both of our exits for those. Right now, we’re going to ignore the strange issue of the one-way passage to Day 3. We’ll come back to that one when we look at Day 3 itself.
It’s important to note one of our first little tricks for driving the traffic patterns in our dungeon. Note that it’s basically in the second room of the dungeon where the players find their first inaccessible exit. They will find a passage choked with thick thorny roots and vines and filled with poison gas. And it is right along their critical path. Moreover, it’s something they will have to see every time they come into the dungeon. It’s a way of taunting the players. Of making them remember this passage is here.
Partly, we want them to remember it because, eventually, they are going to rid the dungeon of the poisonous wooden vines. But partly, Day 8 is one we had flagged as a potential flow problem. Day 8 is sort of optional. After the party defeats the toxic plant monster on Day 7, they will open up both Day 8 and Day 9. Day 9 leads them to the next plot point. Day 8 is just a side area. An important one, as we will see when we do the exit map.
The point is, we need to nudge the players toward choosing Day 8. We’re actually going to use three different tricks to do it. This is the first. The other two will be discussed as part of Day 6 and Day 7 next week. The trick here is that after the PCs fight the boss in Day 7, they will probably be itching to leave the dungeon. Which they will do. And as they leave, they will pass this opening that they have passed so many times already and discover it is now open to them. And when they return, it’s the first new direction they will encounter.
See what I mean when I said that the exit map is lot deeper than you might think? Yeah.
Anyway, excepting the exit to Day 3, which we need to discuss when we talk about the traffic flow in Day 3, that handles all of the exits along the critical path in Day 1. But that leaves us three rooms that the players can’t access. Those are side paths, optional rooms. They could contain optional encounters, discoveries, or nothing at all except the potential for a random encounter. But we have to decide how to link them up.
Whenever we’re adding these sorts of extra exits, we have to be cognizant of the critical path. Imagine, for example, if we added exits like so:
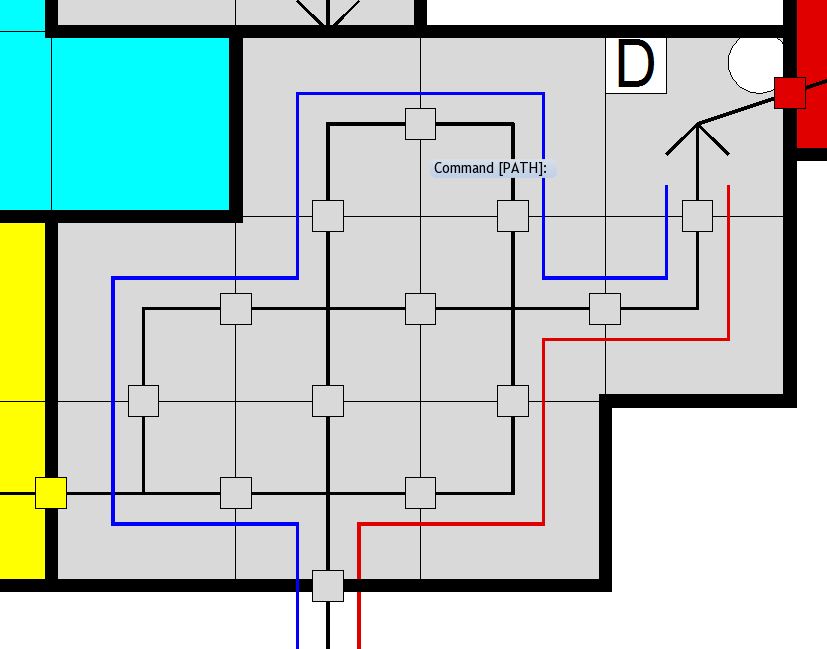
Notice, we’ve completely destroyed the critical path. Now, any of these paths leads from the entrance to the goal:
In and of itself, it’s not bad to provide branching paths. We WILL purposely do that later in some of the days. Options are nice. They create freedom. But we have to be very careful about doing it. For one thing, here, we’ve created paths of very different lengths. Compare how many rooms the red path and the blue path pass through.
That means, depending on the path the party takes, they could have a radically different number of resources when they reach the objective (which will include a sort of “boss fight” with a kobold warband). Again, that’s not terrible when it’s done deliberately. But this is Day 1 of the dungeon and the party will be at 1st-level. And they will be ending with a boss fight. For all of those reasons, we want to make sure the party has a nice, deliberate difficulty progression. We don’t want the dungeon to be either a cakewalk or a slaughterhouse on the first day. We want the players to have enough fun to want to continue this massive adventure that the GM just built.
Also, by short-circuiting our critical path, we’ve potentially prevented the party from ever seeing the entrance to Day 8 that we want to be so damned memorable.
So, as we place the other exits, we’ll just do some simple branches:

The party could go north, see the impassable door to Day 3 (which we’ll come back to), and then even continue on down that path to an optional room. And later on, the party could go south to an optional room. Both of those optional rooms could have neat stuff in them. A discovery and a small treasure, for example. That will be helpful because we’re trying to train the party to explore.
Finally, you might have noticed that turquoise door I added that DOES short-circuit the critical path. What a weird little addition, right? All it does is provide a two-room shortcut. And the party won’t even be able to open it until they open the floodgates. Why would I put that in?
Well, I promise I will tell you about it next time. But, in the meanwhile, consider that your homework. Feel free to think about it. Think hard. Look at the critical path, the various things the party will do before they can open that, and also think about the geography. There’s actually a couple of reasons it’s there: psychological and geographical. You should be able to guess some of them.
Meanwhile, come back next week and we’ll build the rest of the exit map.
The third paragraph of “Setting up the Exit Map” cuts off abruptly.
Making a point of introducing ‘impassible’ doors early does help sell the Metroidvania concept. As for the early turquoise/floodgates door, I initially thought of it being a matter of showing that optional shortcuts will exist in order to trip fewer random encounters, but given it’s the floodgates that particular ‘key’ also points out how water has changed yet again… plus, of course, showing the functional change from giving water to the Desiccated Sanctuary.
Awesome. Can’t wait for more.
Day 13 and 14 are pretty far apart on the map. And Day 13 is sorta off to the left through Day 8, while to reach Day 14-15 you have to go north through Day 3.
So the shortcut near the entrance tells the players “Hey, you know how you flooded and unflooded half the dungeon? Maybe you should revisit some old areas and see what’s changed.”
Looking at the previous maps, once you’ve unlocked this passage, the path to Day 14 is literally “go straight in from the entrance, and turn right.”
Also, Days 9-13 are sort of naturally leading back to the entrance. They’re deep in the dungeon, dealing with the Kobold Queen, Water Breathing, Dragon, Floodgates, one day after another, then it finally spits them out at the entrance so they can catch their breath. So they’re very likely to return to the entrance and see this new shortcut.
In addition to the reasons above. This change tells part of the story that the water was diverted from the Sanctuary in the first place. Plus it shows the players they are restoring life to the dungeon which gives a positive sense of progression.
I design and print my own tokens, and have plastic stands I bought for $0.128 each from TheGameCrafter.com. They work great, except they aren’t to scale.
There are games I’ve seen that are designed “grid-less” and what I see in them is a lot of mechanical effort gauging movement, distances, line-of-sight, and all that. Using a grid eliminates most of the hassle. D&D already has enough mechanics that force players out of in-game immersion. There’s no reason to add more. I’m not saying grid-less is bad, I’m just agreeing with Angry that D&D wasn’t designed for it.
Great article. Love how this is thought out. The only thing Ill ask for clarity with is transforming this map into a use-able solution for open world as you mentioned. What does each day represent, the encounters of their current location? How do i set up directions on a visible map like this?
My party is currently taking a lull of small exploration after finishing a huge mission. Ive done a decent job keeping them adventuring and caring, but If my players take detour to another town, how do I put doors to discourage hopping on their horse and going?
Oh grand master of game mastering and dungeon crafting, a dapper article as always.
I just wanted to pop in and say that I, like many many others, learn better with pictures and I want to encourage you to add visual aids in the articles, no matter how crude they are they make the information in the articles easier to comprehend and to remember, even if they are just squares and lines with text on them.
I was on vacations and was too busy to read the article on time, but since I criticized your last megadungeon article I feel obliged to comment on this one although I’m not sure that you or actually anyone will read it.
I like the digression and side notes which I feel are good tips or general advice applicable out of the megadungeon itself. I like how you do the parrallel with mysteries, and finally I appreciate the fact that you removed the technicalities 🙂
While the object of the article, general map layout, is not a fascinating subject for me, your article does manage to give enough interesting points to make it a little enjoyable, which is no small feat.
So, congratulations for this article which manages to be interesting enough to teach boring but important stuff to people like me.
I enjoy these articles and find them helpful for encounter design in general, but as angry would probably say,” thats the f*** point. Can’t wait for the next one.