
A Dungeon Master does not merely draw a dungeon. Not if they care at all about actual, good game design. I’ve already showed you how to plan out a pretty good Dungeons & Dragon dungeon adventure. Now I’m going to show you how to make a pretty good dungeon map. And, as a bonus, how to turn a realistic floor plan into a good gameplay experience. It’s all to do with a trick called blockout.
Do you remember that whole Pretty Good Dungeon thing I was blathering about weeks ago? Or months ago? Or whenever ago? I was trying to demonstrate how to use good game design principles to make a satisfyingly playable dungeon adventure. It wasn’t high art by any stretch, just a simple adventure about violently ousting some savage little goblins from a waterfall cave, but you gotta learn to fingerpaint before you do the Moaning Lisa.
What say we do something crazy and actually move that project along?
Now this End the Goblins thing is a dungeon adventure, right? More properly, it’s a site-based adventure. Even more properly, it’s a site-based scenario. That means the scenario’s structure, which is how all the gamey bits and pieces fit together, is defined by the layout of the site itself. In other words, the adventure’s map is also its plot.
Incidentally, that’s why dungeon adventures are the best way to learn adventure-building. They’re also awesome. I know lots of you elitist homebrewers consider dungeons beneath you, but I’ve seen your heists and mysteries and open-worlds and, frankly, I think y’all need a lot more work with your fingers because you ain’t up making Lisa…
Anyway…
End the Goblins is a dungeon adventure, and you can’t have a pretty good dungeon adventure without a pretty good dungeon, which means you need a pretty good dungeon map, and so I guess it’s time to break out the graph paper and crayons.
One Does Not Simply Draw a Map
Of course, lots of you are probably thinking it took me too frigging long to get the graph-paper-and-crayon part of the whole dungeon design thing. After all, standard dungeon-design practice is to first decide to do a dungeon and, second, to open Dungeondraft and just start drawing. But I prefer to do this trick I call Actual, Good Game Design. That’s why I can bring my players a crappy adventure about murdering goblins in a cave and still get rave reviews.
That’s why we haven’t gone anywhere near the graph paper yet. Instead, we’ve done a lot of thinking and planning and plotting and note-writing. In fact, even if you don’t realize it, we actually know a heck of a lot about what the map needs to look like based on the adventure’s goals, the game system’s constraints, and all that psychological nonsense about how players explore spaces. All we need to do now is draw the map the way we already know we have to draw it.
It’s just that easy.
Okay, obviously, it’s not that easy. Drawing a random waterfall cave on a piece of gridded paper or in some purpose-built mapping application and then filling it with baddies? That’s easy. Any idiot can do that. That’s why most Game Masters do precisely that. But it’s a lot harder to translate a bunch of designs and constraints and psychologies into a waterfall cave that actually looks like a waterfall cave.
Except it actually isn’t as hard as you might think. The trick is to start by blocking out the dungeon and then to draw the final map based on the blockout.
But before I show you what that means, let’s recall what our map needs to look like.
End the Goblins: A Pretty Good Dungeon Adventure About Ending Goblins
I started with a simple, traditional premise for an extermination-type dungeon adventure: there are goblins in that cave. Someday, I’ll have to teach you about the four broad types of adventure and their many subtypes. But today ain’t that day.
Anyway…
There’s a band of evil, pillaging goblins in a cave behind a waterfall, making trouble for a village, and the heroes have to oust them.
Because of inertia and momentum and other fancy game-design words beyond the scope of this simple series, I decided that, to rout the goblins, the players needed to kill three specific pillars of the tiny goblin society: a warchief, a shaman, and a kennel master. Once they were dead, the goblins would abandon the cave. Until then, there’d always be more goblins in the warrens since the players had no way to determine the exact count anyway.
Because this is a D&D adventure and because I believe in actual, good game design, I decided I’d embrace the concept of the adventuring day and make this a multi-day adventure. The players would need at least three forays into the goblin cave to win the adventure. Ideally, each day would comprise four to six dangerous encounters, and each would end with the heroes confronting one of the minibosses. Then, they’d retreat, rest, and come back for another sortie. Of course, it might not work out that way. The players must be allowed to explore on their own initiative, and they shouldn’t need to know that the real, actual, mechanical goal is killing the minibosses. But I wanted to design the adventure such that, if the players just play as naturally as possible, that’s what they’ll do.
Now, it’d be easy to just make three linear dungeon segments that all start at the entrance and dead-end at a miniboss. You know, just make three lame-ass five-room dungeons and staple them all together at the ass-end? But that doesn’t really provide much in the way of explorable space, does it? Remember that explorable space refers to the number of perceived distinct options the players have at any given moment.
So, yeah, I want three dead-end goblin paths, but I don’t want it to look like I do. Especially because this is supposed to be a windy, labyrinthine goblin cave, not frigging Final Fantasy XIII. So I want to do this game design trick called obscuring the path.
The dungeon needs three paths, each with four to six encounter spaces, each ending with a miniboss, and each facilitating or encouraging retreat and rest at the end, all the while looking like a goblin warren in a waterfall cave.
How do I get that? Well, before I start drawing the actual map, I need to block it out.
Blockout: The Secret Step Between Plotting and Mapping
Blockout is actually crazy simple. I could probably just show you my diagrams — I made diagrams — and you’d just get it. Especially because you’re one of my readers. My readers are smart.
Blockout is kind of like drawing a flowchart or a node map, but it takes into account the general size and shape of the map. Consequently, it lets you see and manipulate the layout of the physical space and how it relates to the golden path plot. This is really important with site-based adventures because, first, you need them to make some kind of physical, geographical sense, and, second, to obscure the golden path, you want to add some side paths and optional cuts between the branches, and you want the branches to crisscross in logical ways. That last trick is more important than you think.
Imagine, for example, my dungeon’s got this big-ass central room with multiple stories. There are no stairs in the central room, just balconies and bridges accessible from the upper stories. Creative players might find ways to climb or fly to the upper levels, which is totally fine, but for the most part, if the players just follow the map, they’ll keep crossing that central room via upper-level bridges and balconies. That kind of interconnectedness helps orient the players in the reality of the space. Better still, it makes the dungeon feel more open-ended, even if it’s fairly linear. Even more better still yet, you can add ladders for the players to lower from above or elevators they can activate for some juicy shortcuts and doors-to-before.
So blockout.
Blockout is really just planning the space before you start mapping it. You just draw blocks representing the encounter spaces in the dungeon. Each is roughly sized, shaped, and positioned how it should be, but because it’s just a rough-and-ready block map, it’s easy to sketch, move, resize, erase, and experiment until you get something that looks good.
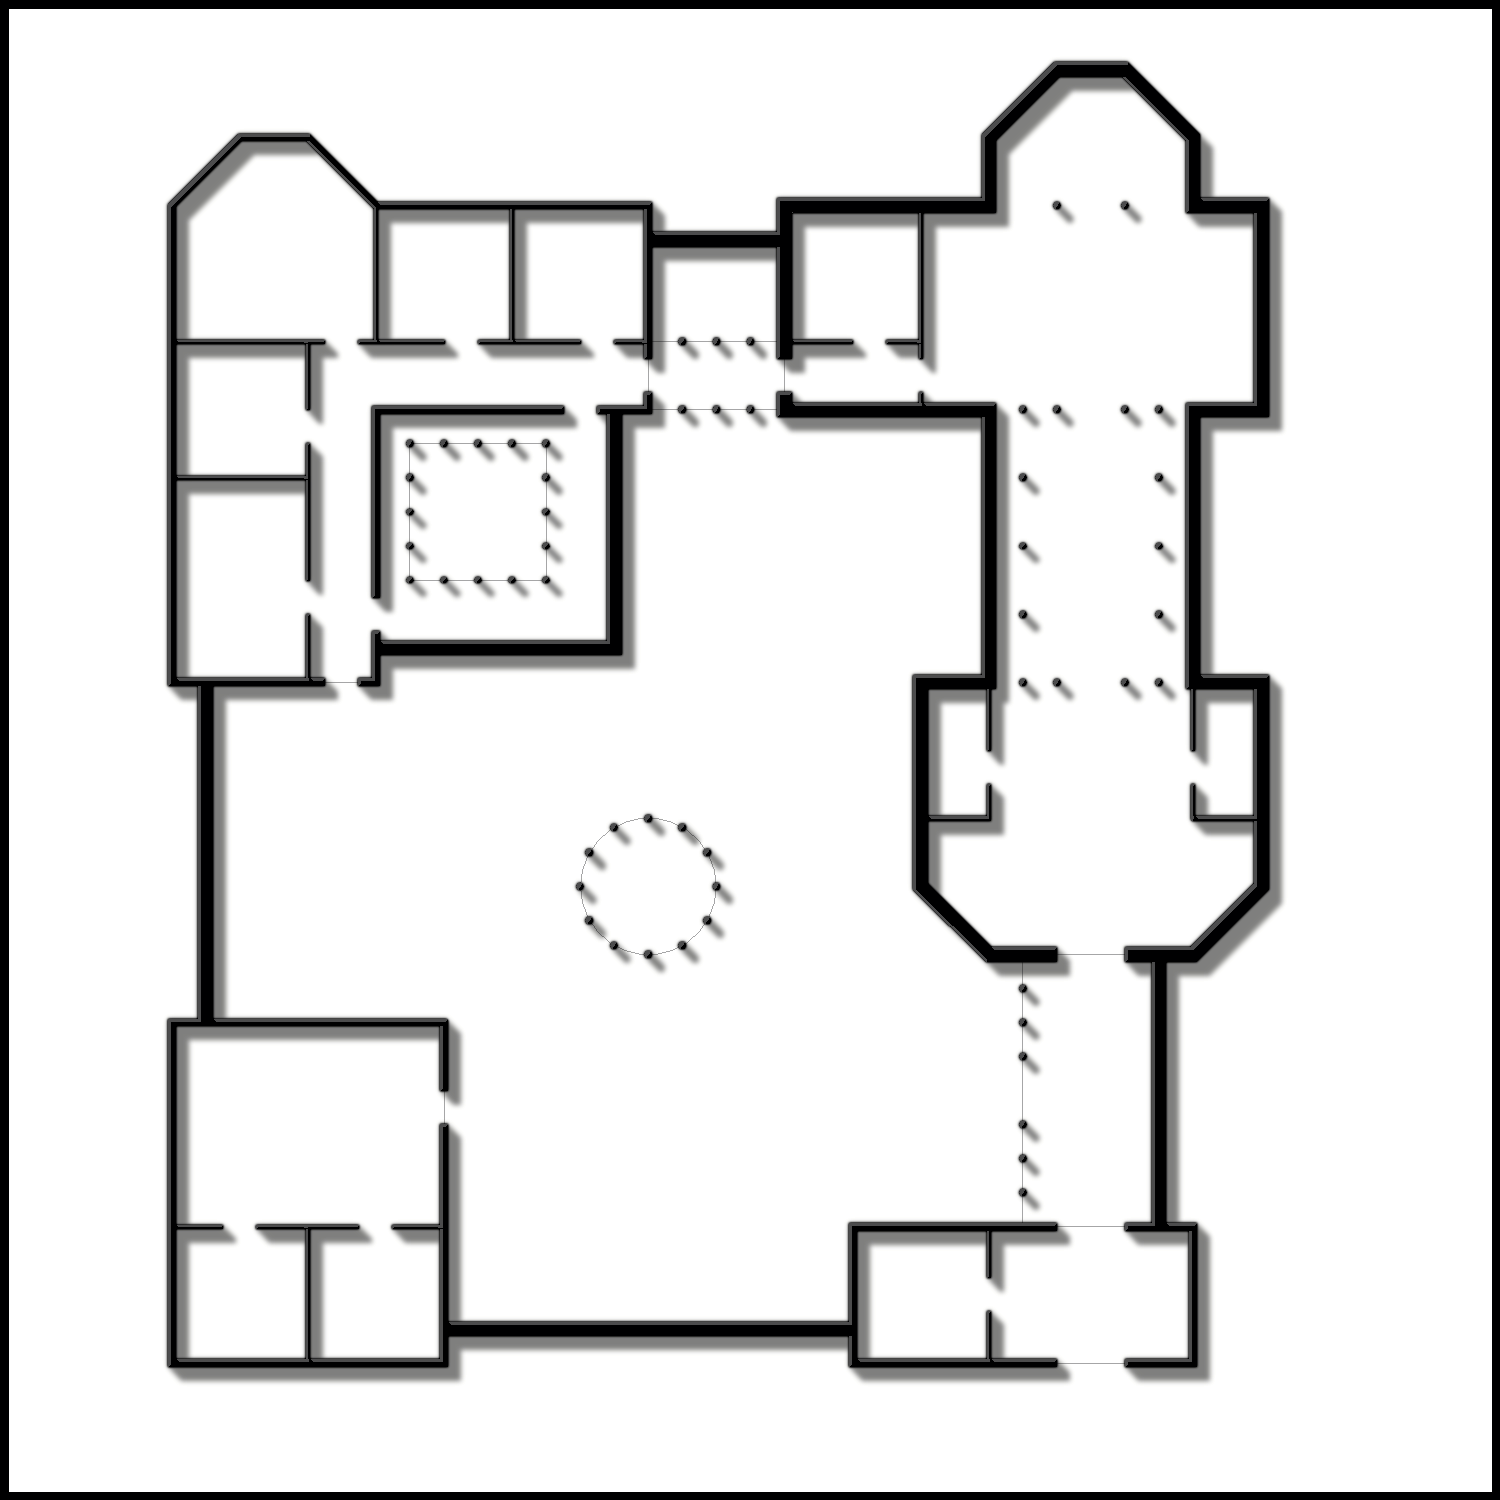
Let me show you the finalish blockout and dungeon map for End the Goblins just so you can see what this all looks like. Then, I’ll walk you through how I got there.
If You Love Your Dungeon, You’ll Kill a Tree For It
Now, I know you zygotes call me unk behind my back and think I’m old-fashioned and stuck in my ways. You’re wrong, by the way. I’m not old-fashioned. I don’t think shit is better just because it’s how I’ve always done it. Have you ever heard me talk about old-school roleplaying games? I actually love modern mapping software. I have to restrain myself from going nuts with all the lighting and line-of-sight horseshit modern virtual tabletops let me do. I like modern gaming.
Mostly.
That said, I’m going to bat here for dead trees. When it comes to blocking out a dungeon, you can’t get better than paper, a pencil, and an eraser. See, this is a quick, rough, easy, dirty process. You can block out a dungeon in ten to fifteen minutes. But it’s also a playful process. You have to be willing to sketch, tinker, toy, erase, and discard. You also have to be willing to make it ugly and scribbly. Once you have a blockout you like, you can easily transfer that into your mapping software of choice to help you draw a pretty, fancy, digital map. That’s usually what I do.
That said, modern mapping software makes it pretty easy to draw, move, resize, and erase simple geometric shapes on a sketch layer or underlay you can hide or remove later. So if you want to use software the whole way through, there are ways. But you gotta find the right workflow. You have to be able to throw ugly ideas down and futz with them. Find a way to make that effortless.
Unfortunately, it’s one part of the process I can’t really demonstrate.
Blocks Aren’t Rooms; Blocks Are Games
What makes this whole blockout thing powerful is that it lets you map the gameplay, not the space. The blocks don’t need to be rooms in a dungeon. They might be, or they might represent several interconnected rooms across which a single chunk of gameplay happens. Imagine, for example, a bunch of windy catacomb tunnels with tombs cut in the walls. When the players hit the middle of the mazelike space, skeletons scrabble off their shelves and converge on the party. Or maybe the players have to cat-and-mouse with a minotaur in the labyrinth section of the dungeon. Or maybe the library block in which the players investigate the dungeon’s backstory is actually split between three rooms full of bookstacks. From a gameplay perspective, it’s one chunk of gameplay and therefore one block, but on a floor plan, it looks like several rooms.
Because the blocks represent gameplay, they help you stay within your gameplay constraints. That whole four-to-six encounters rule in a normal Dungeons & Dragons adventure is a lot easier to stick to if I’m just counting gameplay blocks. And since I know any decent D&D action encounter needs at least 25 squares, I know how big the smallest blocks need to be. As long as there’s never more than six blocks in a row without a trick to get the players to stop and think, I’m good. What kinds of tricks do I mean? You remember: dead ends, doors to before, alternate exits, checkpoints, goals, and thresholds.
We talked about this.
Those constraints are why I take a two-step approach to blockout.
Blocking Out the Block Sections
I always start blocking out my adventures by blocking out the golden path itself. I draw the ideal path from start to end. And I do it in block sections. What’s a block section? Remember what I said about game mechanical constraints and needing to stop players periodically for reasons? Like how in D&D, players need a chance to stop every four to six encounters? Those are block sections.
When I’m planning a D&D map, I work in strings of four to six blocks, and I consider what happens at the end of the block. Something checkpointy or goal-completiony as discussed above.
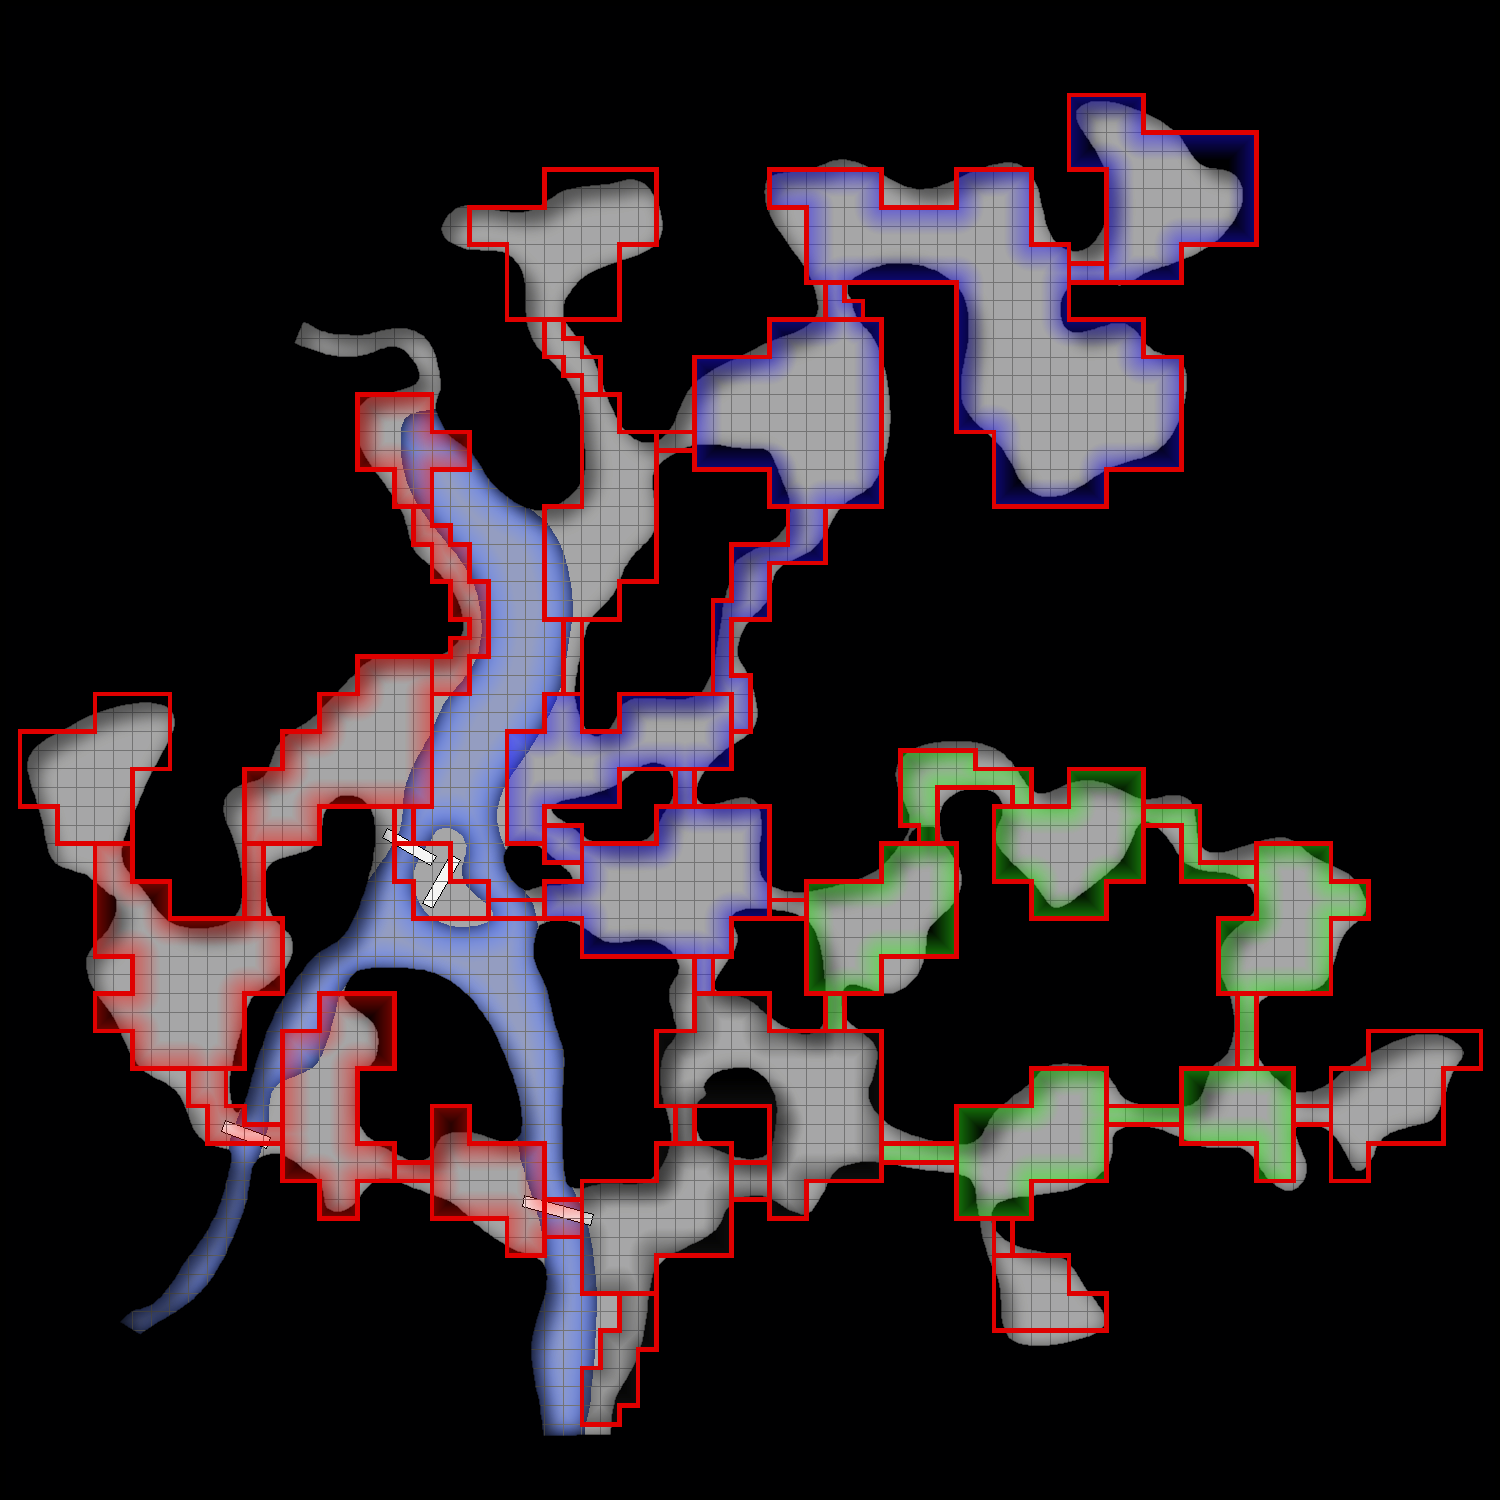
Here’s the initial blockout for End the Goblins. Three adventuring days, three block sessions, all starting in the same place, each ending with a miniboss and then an opportunity to stop, reflect, rest, and return without losing progress or to head in a different direction.
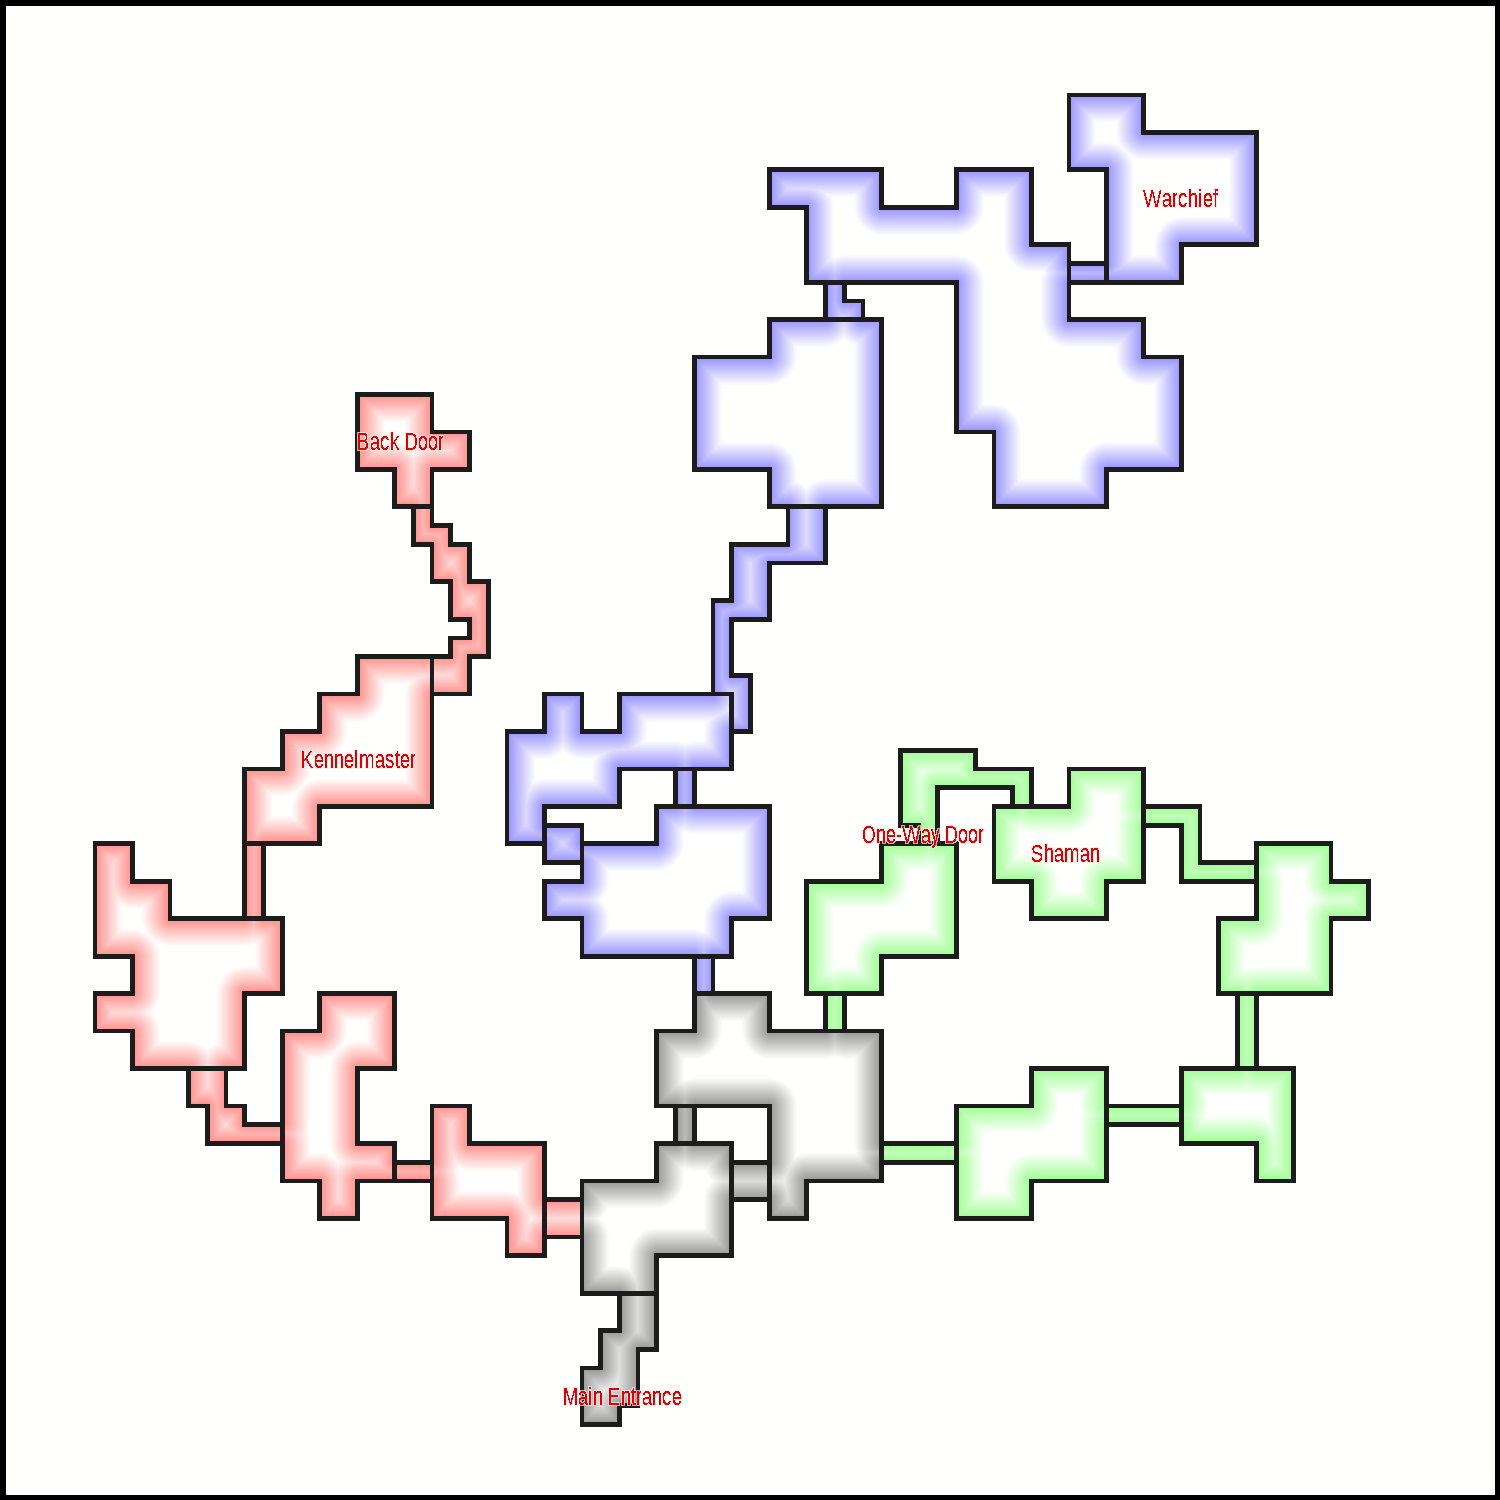
The central space, highlighted in gray, is basically just the entrance.
The blue path ends with the warchief and then dead-ends. There’s room for five encounters, including the boss fight. Once the players kill the chief, they’ve got no choice but to retreat back to the entrance. There, having fought a day’s worth of encounters, it’s convenient for them to return to camp before they tackle another path.
The red path doesn’t dead-end after the kennelmaster. Instead, it keeps going until it climbs back to the surface, revealing a hidden backdoor to the dungeon. After killing the kennelmaster, the players are likely to keep pushing forward because there’s still more path to follow. Once they find themselves outside, resting is a smart choice.
The green path ends, after the party beats the shaman, with a one-way door-to-before of some kind. Presumably, the shaman has a secret way to enter the goblin’s evil worship space. Might the players find the one-way door-to-before from the wrong side and outflank the shaman? Maybe. But then, they’ll fight the boss first and then probably continue to clear the entire green path before ending up back at the dungeon entrance. That doesn’t ruin the gameplay, so it’s a fine sequence break for the players to accidentally their way into.
You see how this crap works?
Hiding the Path
Once you’ve got your block sections how you like them and think you’ve got a solid gameplay experience, you could stop and draw a map over your blockout, but you’re usually better off adding a few optional blocks and cuts. Just enough so that, if you took off the color-coding and labels, you’d have a hard time spotting the actual gameplay plot.
We call that obscuring the golden path, and it’s how you turn a plotted pile of block sections into a truly explorable space.
Remember that the goal is to let the players explore and even find alternate paths through the dungeon without letting the players ruin the gameplay experience. You can always safely add one or two side rooms or even a branch to a block section because, in the end, you’re probably not going to put a risky encounter in every block. You need some empty space, treasure rooms, and non-dangerous encounters, too.
Likewise, you can safely let players cut from one block section to another, but you gotta be smart about it. Remember, players are forward-biased and will always try to push one more room ahead, even if they’re hurting, so you don’t want to dump them from the end of a full-adventuring day into the middle of another one where forward in any direction means more fighting than they can handle.
It’s also at this point where you start thinking about how the space might make sense.
Here’s what I added to End the Goblins.
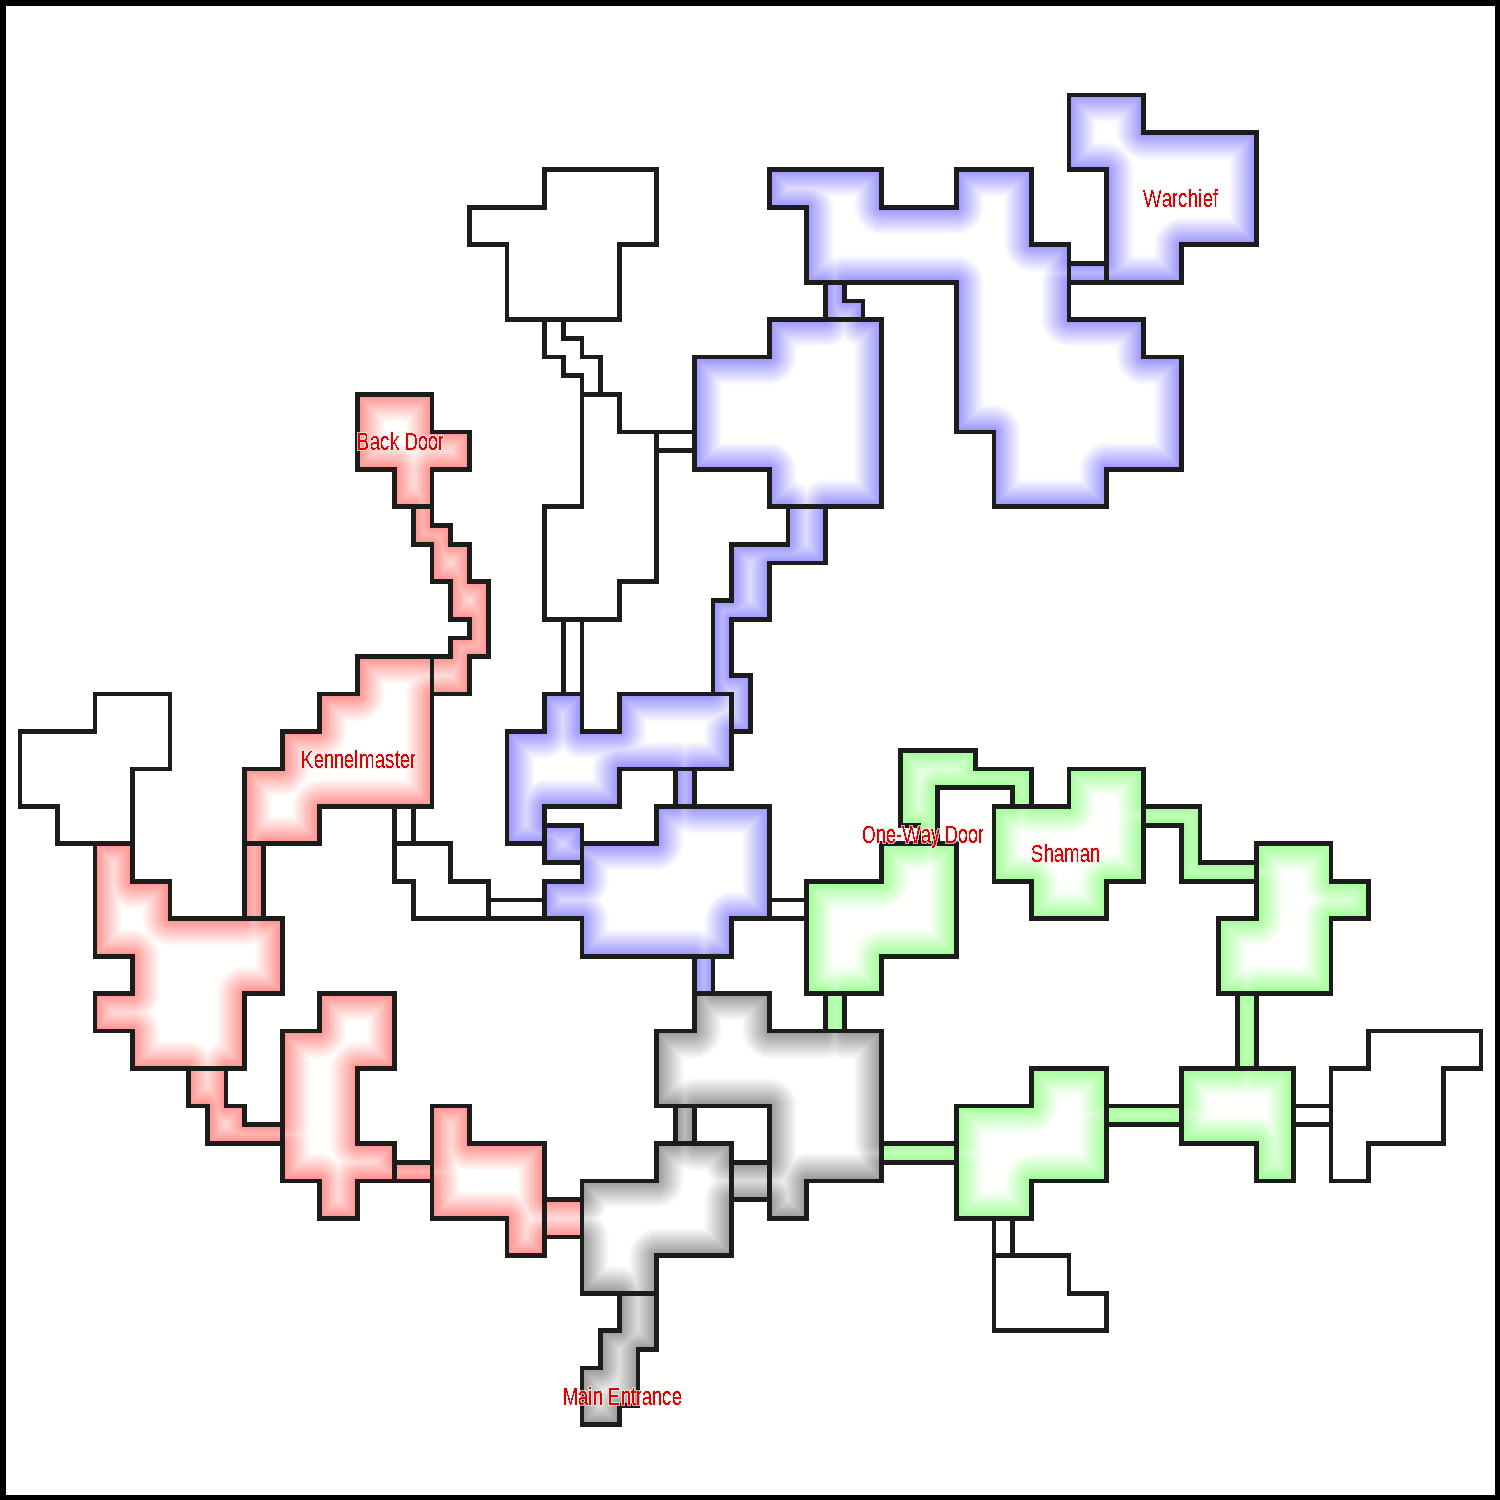
Obviously, I added some side rooms and a branch to the blue path. Neither is a big deal. The side rooms are just side rooms. The branch means that, depending on my final design, the players might either bypass an encounter on their way to the warchief or have one encounter extra. Either is fine as long as I don’t put more than six total encounters along that blue path.
I also made connections between the end of the red and the green path to the start of the blue path. In my mind, the blue path is the goblin’s main living quarters, so that first room is sort of a nexus or central hub. The red path is mostly space for the animals, and the green spaces are where the goblins bury their dead, and the goblin shaman performs unspeakable rites to the goblin gods and maybe harvests toxic mushooms for goblin potions.
Now Draw the Rest of the Dungeon
Once you’ve got a pretty good blockout, all you have to do is draw a pretty good dungeon over it. Seriously. Just throw your blockout on a semi-transparent sketch layer or a light table, or put a piece of tracing paper over it and just draw a map on it.
There actually isn’t any magic to this step. This is just the creative art part of the whole dungeon-building thing. Just make a pretty map. You don’t have to worry about the plotting and planning because it’s already done. The plot and plan are the things you’re mapping over.
Here’s the finished End the Goblins cave, though note my scare-italics on the word finished because this really isn’t a finished map. The next thing I’d do, if I were actually making an adventure out of this, is to plan individual encounters, which would include adding features to the rooms. Terrain, standing pools, columns, and rock formations, that kind of thing. You probably think that’s all part of the mapping step. It ain’t. That’s encounter design. I guess I’ll have to cover that too at some point.
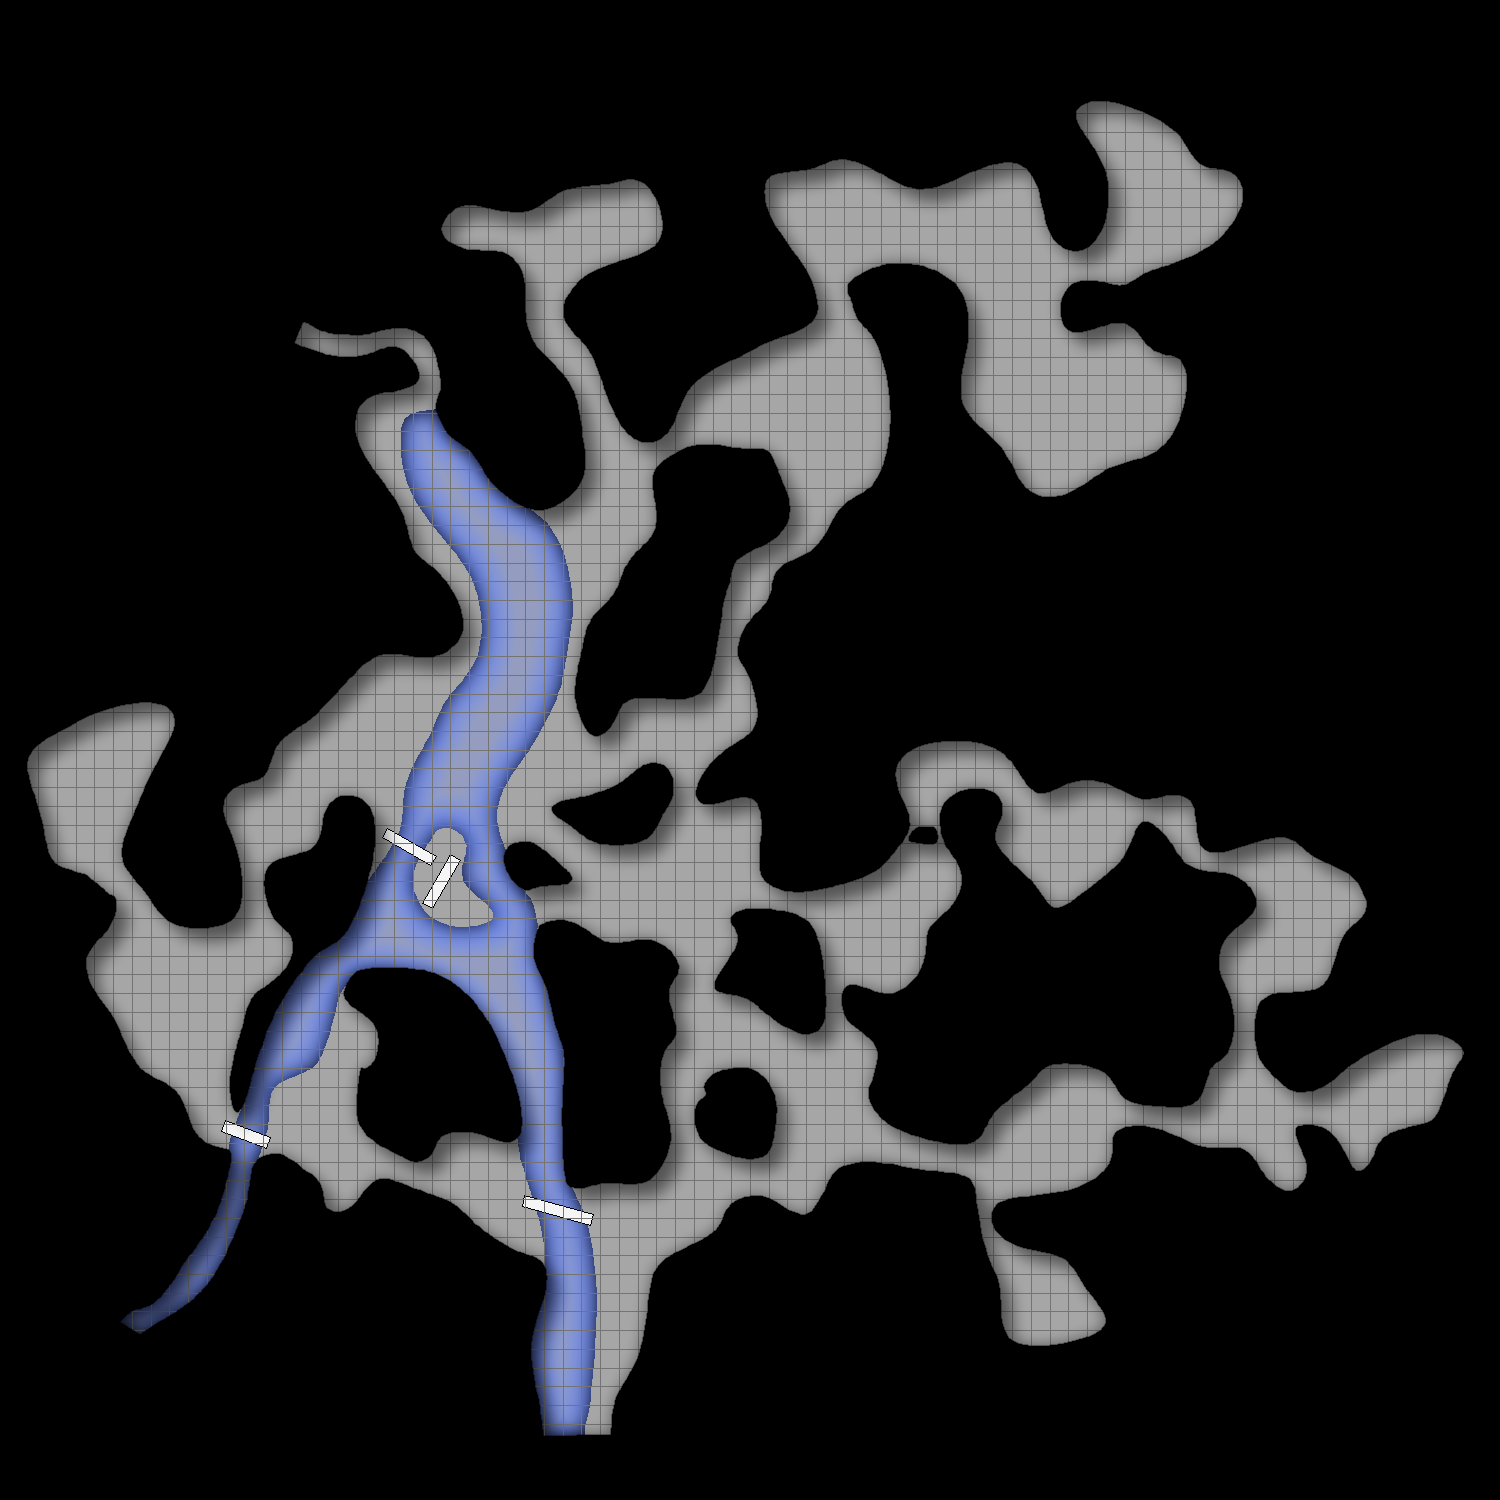
As you draw your map over your blockout, remember that the blocks aren’t rooms and they don’t have to be. Nor do the spaces between the blocks have to be walls. Nor do the connections need to be halls. Note that I used a deep, fast-flowing, impassable river instead of walls to divide the kennels from the living quarters and used little bridges to cross it. That gives me a nice geographical feature that the players can orient their sense of space around. I even left one of the bridges retracted so the players can open a shortcut.
I could also have divided any of the blocks into multiple rooms or into a more complex space. I actually wish I had. Maybe I should have made one of the green caves a catacomb with shelves for dead goblin skeletons. Whatever.
Either way, that’s it. That’s blockout. That’s how you turn plotted game design into a fun-to-explore map that doesn’t feel like game design at all.
But…
There’s one other useful trick you can pull off with blockout. Suppose you already have a nice map, but it doesn’t really work as game design. Blockout lets you fix that. Let me end by quickly showing you how.
Remapping a Map into a Pretty Good Dungeon
We Game Masters don’t always have the luxury of carving out bespoke underground spaces for our adventure sites. In fact, lots of us strive to make our maps actually look like actual, you know, things. Castles. Temples. Abbeys. Mansions. Towers. Gatehouses. Whatever. Some of us even grab historical floor plans to help us map.
The problem is that real-looking spaces don’t actually make for good game design.
Suppose I’ve got this map of an abbey I want to use as an adventure site.
Now, I drew that myself, but it’s the kind of historical floorplan you can find pretty easily online. It’s just a gatehouse, a temple proper, a dormitory with a cloistered garden, and a work building all around a walled courtyard.
Simple right?
Suppose I task my players with recovering the icon from the ruined abbey. I want the adventure to climax with a demon spider guarding the sanctuary or something like that. Simple dungeon crawl with a treasure and a boss fight. And, because I run D&D and I believe in actual, good game design, I want to make an adventuring day out of it.
Well, that just ain’t gonna work, is it? Even if I don’t explicitly tell the players the icon is in the sanctuary, that’s the first place they’ll look if they’re in goal-seeking mode, and the sanctuary is easily accessible right from the entrance to the abbey. Hell, everything is accessible from everywhere. The map is too damned open. It’s like it’s designed to easily allow human people to get wherever they need to be. That’s like the opposite of an adventure.
So what do I do? I drop my map onto the transparent sketch layer or drop it on my light table, and then I do a bit of golden path blockout over it. Basically, I draw the ideal gameplay I’d like to happen as a block section over the map. I follow the overall design of the map, but I don’t treat every temple wall as canon.
I might get something like this…

I’ve decided the players can either enter through the gatehouse or through a breach in the narthex of the temple proper, but either way, they’re forced to explore the courtyard next. That’s a good place for gargoyles or bloodhawks or bloodhawk gargoyles. Then they end up in the dormitories where their path branches. They can either work through the interior rooms or else cut through the cloistered garden, where they force their way through some poisoned overgrowth or something. Then, they enter the sanctuary proper from the west for the boss fight. The workrooms and remaining interior rooms work as optional side chambers.
Now, I drop the blockout layer down to another transparent sketch layer or whatever, along with the original map, and I draw a new map over it. Though it isn’t really new. I’m just creatively redesigning the original map to match my blockout. I can move doors around or remove them altogether, opening and closing passages as necessary. I can strategically lock and bar certain doors. If the place is a ruin, I can block halls with rubble or even collapse entire rooms, and I can open breaches in existing walls. And those are just the obvious solutions.
If my site is half-sunk into a marsh, I can flood rooms or use sucking mud or impenetrable swamp growth to block off paths. If my site’s on the side of a volcano, I can use lava flows and sulfur fumes. If it’s stuck out-of-phase due to some kind of Philadelphia Experiment accident with a stolen Romulan cloaking device, I can just use voids of nonreality to erase whole chunks of the map.
But, for this little project, I took the easy way out and just ruined the abbey. I caved in the sanctuary and part of the dormitories, opened a few breaches, and called it a day.
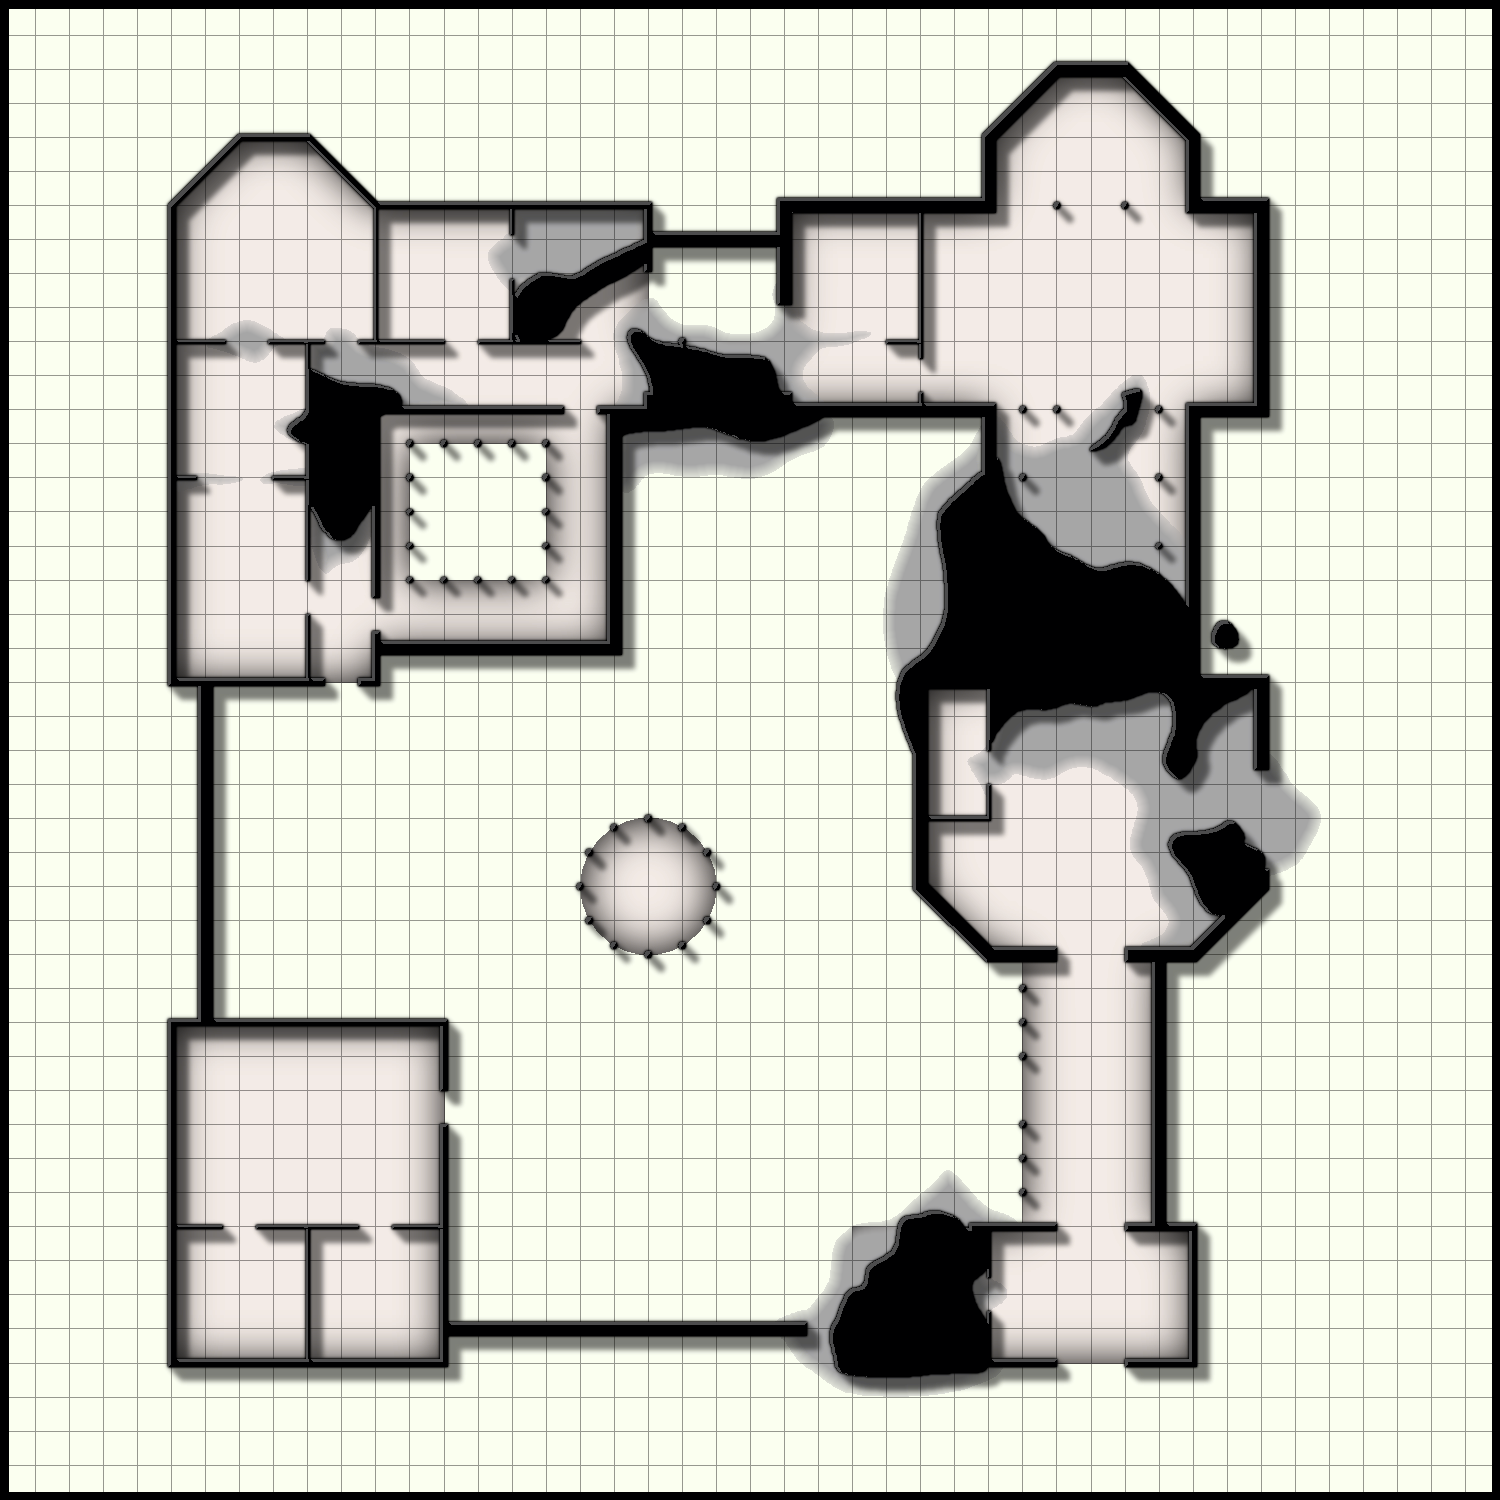
Hey! I didn’t promise high art. I just promised a pretty good dungeon map.
Love this article! something in my brain just *clicked* from reading this as I thought about the next dungeon I need to build in my campaign. I was struggling with how to juggle its time constraints (it’s a countdown timer), the golden path and how the dungeon should feel when it comes to balancing exploration and progress. This helped boot my brain into action – where’s my pencil and paper?!
This whole Pretty Good Dungeon series has been absolutely awesome. Seeing the actual process you’re using to come up with scenarios that have all of these game design parts working together really helps me connect the dots. I have dozens of pages of notes at this point and they’re all kind of discombobulated, but this kind of stuff is the glue that lets me stick it together into something real that I can actually do.
*sips coffee* This is some serious gourmet #!$%
Here in the UK, the recent heatwave disrupted all the time I’d intended to set aside for campaign prep. I’m finally getting back to it, and this article dropped at just the right time to get me back into the dungeon design headspace. You’re an absolute hero, Angry!
“This is just the creative art part of the whole dungeon-building thing.”
See, that’s the hard part for me. I have the artistic talent of the average kindergartner. Stick figures with 3-6 fingers on each hand are my limit. As a result, I almost always end up stea… um… FINDING dungeon art online that people much more talented than myself have drawn. (either that or tracing over streets of small towns I find on Google Maps to lay out a village)
Then you go and show how to take existing art and Angrify it. ::chef’s kiss::
This is why one of us is a sexy gaming guru and the the rest of us are just GMs who want to make our player’s games better. (at least we’re smart enough to be here to listen and learn)
Dancing for an article “about the four broad types of adventure and their many subtypes.”
Agreed!
Loved this article! I do have two questions after seeing the map.
First off, how would you prevent the End the Goblins quest from becoming a goblin-killing slog? If I understand the articles correctly, it’d sum up to around 18 to 30 goblin fights. Even if you introduce terrain differences and different kinds of goblins, 18 goblin fights still seems like a lot to me and I’d worry about my players getting bored of killing goblins.
Second, I love the idea of using a river as a “wall”, but how would you separate the encounters on either side of the river? A river may block movement but it doesn’t block sight, arrows, or Misty Step. Wouldn’t the encounters bleed into each other? If this were my campaign, I’m not sure how I’d balance that while making sure it still looks and feels like a “real” cave.
I was under the impression “encounter” means something interesting that might use up resources. I don’t think they’re all goblin fights.
Genuinely one of my favorite articles you’ve ever written, it may even take the top spot! Thanks for this one!
Great article, Angry!
Please continue this series and dive into the encounter design! I would love to see how you ensure that the challenge jumps up and down while trending upward, how you make each delve into the cave more difficult than the last, and how you show the PCs the effects of their progress as the warlord, kennelmaster, and/or shaman are defeated.
“But, Angry, WHY?”
(I’ll be less petulant in explaining why I’m asking.)
Way back in 2019 when I was running my first 5e campaign after a long break from D&D, I read your fantastic article on the different types of maps. https://theangrygm.com/maps-whats-on-your-table/
You led me to the freeing revelation that as a DM I don’t need pretty maps. A boxes-and-lines flow chart style map could be perfectly fine and I don’t have to draw Dyson-Logos-style exploration maps. Since then I’ve trained my players (well… as much as players can be trained!) to draw their own damn exploration maps.
So I was surprised to see you building pretty exploration maps for End the Goblins. I’m sure there’s a good reason!! Will you help me understand?
(By the way, the river thing is very cool.)
Those aren’t Exploration Maps for the player. Those are my maps for designing and running an adventure. And they don’t have to be pretty. I could do the same thing with a Sharpie marker on graph paper. In fact, I did. But to publish on the site, I figured they’d be more readable if I used software to make them.
Prioritizing player agency and practicality is smart, especially when dealing with new spaces. Such as those encountered during new dungeon play.