


Happy Megadungeon Monday.
It’s been a long time since I typed that, hasn’t it?
I thought long and hard about how to do this, how to resurrect this series. The funny thing is, though, is that I wasn’t thinking long and hard about the design stuff. I mean, I had pretty much left this series off in the middle of a major planning step. I got halfway through joining up all of the encounter areas in my dungeon with color-coded doors. The thing I called the Exit Map which was – is – going to serve as the underlay for mapping the entire Megadungeon. From that perspective, restarting would be easy. Finish the damned Exit Map and then start mapping.
But it’s been nine goddamned months since I did any work on this project. And the project had been sputtering before that. And people LOVED this f$&%ing series. They missed it. I lost supporters and fans over its’ long hiatus. I couldn’t just stroll back in like everything was fine. “Oh, hey, here’s the latest entry in the Megadungeon series for you all. Enjoy! What? Why are you all looking at me like that?” But, at the same time, no one really gives a f$&% about the explanation for the hiatus. And that includes me. I don’t care about my reasons. My excuses. I care about the actual project. I’m tired of looking back on the past year of my life – two years really – and all of the chaos it entailed and using that as an excuse for failing to live up to my promises and potential. I’ve spent the last three months struggling to make up for it and get myself back on track. And that’s going well now. Why dwell on it.
So, in deference to the fact that I don’t want to go over the excuses, and you don’t want to hear them, and we all just want to sit here and build an awesome giant dungeon project, I’m just going to acknowledge the bad f$&% up and say sorry and then get back to just doing what I’m supposed to be doing. I f$&%ed up. I’m sorry. Now, let’s get back to Megadungeoning.
Oh, and if you’re one of the many, many, MANY new readers who’ve appeared over the past nine months and don’t know what this about, well, you probably want to go back to the beginning. But, to give you the short version, I’m building a massive D&D dungeon adventure along the lines of Metroidvania-type video games to take players from level 1 up to level 12. And I’m using all sorts of design tricks that video games have refined over the years to make it awesome.
Okay? Failure acknowledged. Apology issued. Project explained. Now, let’s just pick up where we left off and finish the exit map.
Reminder: Level 2
Before the little hiatus, I spent two weeks and 10,000 words discussing in detail how I turned the critical path map into an exit map. I’m just going to slap these before-and-after maps here to remind you what it looked like when I was done. If you want to know how that happened, go back and reread those articles.


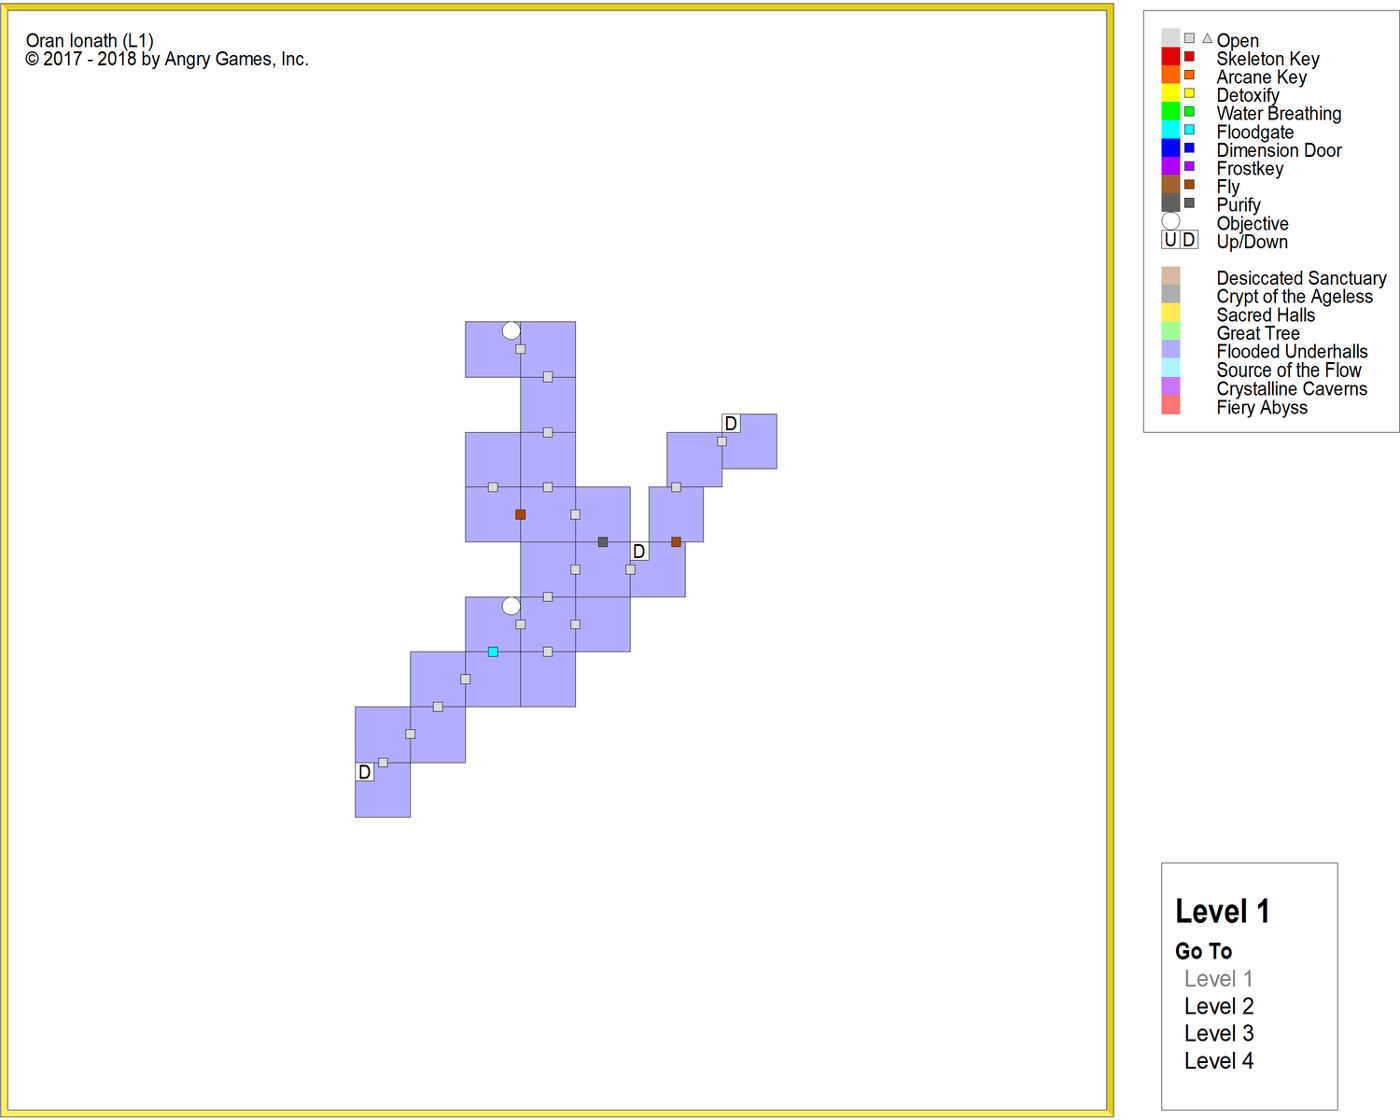
Level 1: The Source of the Flow
Let’s take a quick look at the first level of the dungeon. It’s pretty simple and straightforward, so it’s a good place to jump back into the project.

This level, if you recall, contains only a single dungeon region: The Source of the Flow. That consists primarily of a massive underground lake and the waterways that lead off of it. Lacking any other option to stop the Demon Queen from breaking free, the elves diverted the flow of the water that fed the Desiccated Sanctuary into Sacred Halls and flooded the Flooded Underhalls and the Crystalline Caverns below. After the heroes gain access to this area, they will be able to open the floodgate, draining the water from the lower levels of the dungeon and restoring the flow of water the Desiccated Sanctuary.
Day 12 is a pretty linear area. It simply connects the stairs that come up from Day 11 to the stairs that lead down to Day 13. It’s unusual because the objective – the floodgate – is in the MIDDLE of the day. And the rest of the path is inaccessible until the players open the floodgate. Basically, to continue exploring, the players will have to open some sort of mechanism, and that mechanism will change the water flow in the dungeon. Assuming the players don’t simply double back or retreat, they HAVE TO open the floodgate to continue.
It’s also an unusual day in that it follows immediately after the party defeats the dragon on Day 11. And while we have thus far been envisioning these paths as days of adventure, it’s possible that the players won’t retreat after defeating the dragon. They might continue on beyond the boss fight into the new region of the dungeon immediately. And when they do that, they will find that the new region leads to another new region, Day 13, on level 2. So, here’s an area where the party might substantially break the “adventuring day” structure of the dungeon.
That’s totally fine. They should feel free to do that. And if they do, what they will find is that the areas beyond simply connect back to previously explored areas of the dungeon. They don’t really go anywhere. Day 13 simply serves as a connection and shortcut between Day 8 and Day 9. Extending that further, it actually serves as a connection between Day 1 – the entrance to the dungeon – and Day 10 – the place where TWO new areas for exploration have opened up: Day 14 and Day 15. Of course, Day 14 also connects Day 2 to Day 10, which makes it actually serve as another shortcut between the entrance and the real goal, Day 15.
The point is, the party will now have an apparently large explorable space. They’ve opened up several different areas along two different major paths that lead to their next goal, Day 15. Basically, after they come down from the source of the flow, they have three full areas of the dungeon to explore in any order and an optional area in Day 1. In the past, when the party had such openness, we used tricks to goad them into following the right progression. But this time, we’re not going to. We’re going to let them enjoy the open-endedness.
And there’s three reasons for that. First, they defeated a MAJOR foe and had a huge climax when they fought the green dragon, which they’ve been building toward in a fairly linear fashion for several days. Second, the floodgate represents a major transformation of the dungeon environment, and we want them to feel like they have opened up an array of new possibilities. Third, the party will likely gain 6th-level as a result of defeating the dragon. And we identified that level as the beginning of a new power-level tier. So, giving the party some freedom to start exploring that new tier of power will feel good.
However, there is one factor that might help to push the party to retreat from the dungeon after defeating the green dragon rather than pushing through Day 12 and Day 13. Assuming they’ve not gotten every single scrap of XP we’ve hidden in every corner of the dungeon to this point, they will likely gain 6th-level as a result of the green dragon fight. And, assuming we tell the GM running the adventure NOT to allow the players to level up inside the dungeon, that will force them to obey the adventuring day structure and retreat. Especially if they also have a bunch of treasure to spend.
All of that said, the actual exit map for Day 12 is pretty straightforward. As is the exit map for Day 23 along the cursed shore of the lake where the party will have to hunt down and placate one of the four founder spirits and the optional area that simply connects – by the expedient of flight – the Source of the Flow with the Great Tree region. Here’s the end result:

Level 3
Is this all starting to sound familiar? Connecting a bunch of boxes with little doors while overthinking the players’ behavior to the point of absurdity? That is the very essence of the Megadungeon. At the very least, that’s the very essence of these design blogs. But if we don’t speed this up, we’re going to be doing this exit map thing for three more weeks. The problem is, it’s actually a lot quicker to do this than write about it. For example, I went from this:

…to this:

…in about fifteen minutes. They’re just color-coded boxes after all. And, to be honest, I explained a lot of the logic in the massive mapapalooza that was the Level 2 Exit Map. So, we’ll be moving a little quicker here, and I’ll only be calling out some of the highlights in the critical path and the exit map. But I won’t be explaining the placement of every single goddamned exit.
Let’s start with Day 2. Day 2 takes place in the Crypt of the Ageless, which, as the name suggests, is a crypt. The dead here have been animated by the spirit of the elven hero who died holding back the forces of the Demon Queen. Actually, she died when the dungeon was flooded, and she felt betrayed by the four founders of the Megadungeon. She would have gladly given her life to hold back the demonic forces long enough to allow them to flood the dungeon, but they didn’t tell her that was the plan. So, she’s a cursed spirit, and her rage is causing all of the other elven spirits and corpses to do the undead thing. But they are currently contained because the Crypt is sealed.
But then, the party ends up trapped in the crypt when the hallway they are in – after their Day 1 adventure – collapses and buries them in the crypt. They have to find their way out. I’m sure you remember all of this. It’s only been a year since we talked about it. And when they find their way out, they will unseal the crypts, which will allow undead elves to roam the halls. And they will continue to appear as wandering monsters until the party lays the elven spirit to rest.
Now, the original idea was that there is a locked and barred door leading from Day 1 into the rest of the Megadungeon. It can only be opened from one side. Once the party got trapped in the crypt, they would eventually find their way out of the crypt – unsealing it – and end up BEHIND the locked and barred door. Which they could then open. And thus the path from Day 1 to Day 3 would be clear. So, the progression would be something like this. On Day 1, the party visits the dungeon and defeats the kobold raiders. On Day 2, the party returns to the dungeon and explores the passage beyond the kobolds, falling into the crypt. They’d climb out of the crypt and open the door between Day 1 and Day 3. Then, they could retreat and rest from their adventure in the crypt. Then, on Day 3, they’d explore the area beyond the barred door they opened to get back out. Simple, right?
But, that’s also some dangerous s$&% to pull. Because we’re talking about trapping a 2nd-level party in the dungeon and not letting them leave until they have found their way out. If they have a bad day, the encounters might wreck them. And they’d be unable to retreat and rest if they need to. Which means, if the day is just a little too much for them, someone might die.
If you look at Day 2 and Day 3, you’ll notice there are actually TWO one-way doors, TWO ways out of the crypt, and the critical path splits in TWO. Look:

So, when the party drops into Day 2 – at the Green Arrow – they can EITHER go north or go west. Each path will lead them to one of the two paths leading up to Day 3. If they go west, they can open the FIRST barred door from Day 3 to Day 1, leave the dungeon, and rest. If they go north, they open the SECOND barred door in Day 3 and then the FIRST barred door from Day 3 to Day 1, leave the dungeon, and rest. In other words, they only have to do HALF the adventuring day to be able to escape from the dungeon. Once they open one of the two exits, if they are desperately in need of sleep, they will explore the dungeon. But if they are doing well, they will probably stick around and keep exploring.
That said, they will have to be careful. Day 3 contains monsters more powerful than they are ready for if they haven’t yet attained 3rd-level. So, if they try to push into Day 3 before completely exploring the crypts, they will probably be forced to retreat. But if they are in Day 3, they can retreat. They won’t be trapped.
The whole thing is basically a failsafe. In general, you want to be very careful about trapping the party anywhere and taking away the opportunity to retreat and rest. All you might be doing is consigning them to death.
The party won’t return to Level 3 until Day 10. They will be able to explore this area after destroying the poisonous plant brain and defeating the kobold queen. Here, they will find the relic that allows them to breathe underwater. They will also find entrances to two other areas, Day 14 and Day 15, that are both flooded. And this forces us to confront a problem we highlighted a long time ago when we were first talking about gating.
We have these flooded sections of the dungeon, and we don’t want the party exploring them while they are flooded. But we also have an artifact that will allow the party to breathe underwater. And we will be including flooded passageways that the party CAN explore once they can breathe underwater. And that creates a tricky problem. What if the party uses the water breathing relic to try to explore the flooded portions of the dungeon?
When I first raised that question, I pointed out that water breathing – or whatever ability we decide to give the party that allows them to not drown after three or four minutes of being submerged – water breathing doesn’t remove any of the OTHER problems with being underwater. Like the fact that mobility is extremely limited. And most attacks underwater are made with disadvantage. In fact, if we want to do this right, we’re going to want to spell out the rules for underwater encounters for the GM when we write the adventure up to make sure that the party is sufficiently screwed.
Essentially, we want the water breathing artifact to do nothing more than allow the party to pass through short, submerged passages. We want them to be afraid of getting into any sort of actual fight with an aquatic creature. And to do that, we have to train the party.
And so, we’re going to steal a Metroid trick in Day 10 to make sure we have a chance to teach the party what they can – and can’t – use water breathing for.
I’ll show you what I did. Look here at Day 10:

To get to the water breathing relic – the objective in Day 10 – the party follows a long, looping, linear path. They will pass two flooded passages that lead deeper into the Flooded Underhalls along the way. But they can’t breathe water yet, so those passages are just enticements. And then they pass through a one-way door exit – a passage they can’t get back through somehow – and end up in the room with the water breathing relic. And there’s two exits from there. One – the green one – is a water breathing exit. The other – the turquoise one – is a flooded chamber that the party shouldn’t enter until they drain the flooded underhalls. Now, those two passages will probably look the same in the universe, right? I mean, one flooded passage looks the same as any other.
First, when we design the map, we’ll have to find a way to differentiate between the two. One might clearly just be a natural stream or river with no space for air above it. The other might be a slimy, flooded, constructed chamber that was clearly never meant to be underwater. Somehow, we will establish a visual clue. So that the players can see the difference.
Second, the party is forced to use the water breathing relic to get out of the chamber using one of the two passages. If they go west, they will find a quick, safe swim – probably a swim that is just too long to do without water breathing – and emerge in a dry space beyond. If they go south, they will find themselves in an underwater section of the dungeon. They will find a door they can’t open, even if they try, and they will find a combat. And in both spaces, they will find a combat. An underwater combat. Not too terrible of one, but one that will let them discover just how screwed they are underwater. One that will let them realize they can’t explore an entire underwater dungeon because breathing isn’t the only problem.
Basically, we’re creating a forced tutorial where the party has to learn to use their relic and also learn its limitations. And then, if the party does decide to check out either of the other flooded passages – the ones leading to Day 14 and Day 15 – we will make sure they encounter the visual cues we established and also allow put dangerous creatures inside and we’ll set up those encounters so the party can see the encounters before they happen and escape easily.
Is it foolproof? No. The party might come up with elaborate plans to explore the flooded regions before they are drained. Or they might send a shapeshifting druid alone to explore the flooded passages. They might even deal with the first encounter. But we can make sure that the danger escalates as the party goes deeper. Sure, someone might eventually get killed. But that’s how adventuring goes. At least we’re giving fair warning.
There’s only a few other elements of note in the Level 3 exit map. Everything else is fairly straightforward and follows the same logic as previous areas. So, let me call those out quickly. And I’ll admit some of these are the sort of subtle nitpickery that most people wouldn’t bother with. To wit, let me talk a bit about geographical consistency.
I mentioned back in a previous article that I wanted to find ways to tie the dungeon together. To make it feel like a whole space instead of a collection of encounter spaces or a bunch of mini-dungeons slapped together. Hell, that’s the major reason for unifying sections of the dungeon into different geographic regions. Obviously, doing so helps trick the players into thinking they are exploring a real space instead of just playing a game. And, moreover, it helps them map and navigate. It helps them understand the space. And that means it also makes it easier for them to remember details about the dungeon. But those aren’t the only benefits. Geographical consistency also makes it easier for you to design the space by giving you large elements to work around. For example, there is a river that runs from the Source of the Flow, through the Great Tree, and down into a rift, all the way to the Fiery Abyss. That element connects the spaces vertically, gives a realistic geographic feature to add some verisimilitude to the dungeon, provides a late-game shortcut to the bottom of the dungeon for flying parties which they will likely recognize as such, and also tells me – the designer – that certain features have to pass through certain encounter spaces.
At the same time, such features also allow the game’s designer to reuse certain elements so the party can easily recognize them and pull out appropriate solutions to them. Or, at least, use certain solutions as a starting point. In short, they provide motifs for the encounter spaces.
Setting up such geographically consistent features can be tricky. It requires you to look at these utterly abstract spaces that we’re working with and see them as physical realities. But if you can train your brain to think that way, you can do some interesting little tricks. Here, for example, are two little geographic features in Day 14 and Day 15:

Notice there are a couple of rooms in Day 14 and Day 15 – and a few on Level 2 as well – that are accessible only via water breathing. And they are in sections of the dungeon that are only accessible after the water is drained. What are these? Well, they are obviously rooms that weren’t completely drained. The space remains submerged. There was no outflow for the water. It pooled there. Neat, huh?
Here’s another more subtle one. Check out Day 18:

Recall that the progression is that the party will unlock purple rooms first – those require the Runeforged Frostkey or whatever the hell I called it. Then, they unlock the brown rooms which require them to be able to fly. Then, they can access the dark gray rooms after they eliminate the corrupting spirit and remove the miasma of necromantic death magic. So, there’s no reason for purple exits between purple, brown, and dark gray rooms. At least, not from a gating perspective. For example, once the party can fly, they can use the southern brown door to reach the brown region that is Day 20. There’s no reason for a purple door immediately beyond. And once the corrupting spirit is dead and the party can enter the dark gray, optional area to the east, there’s no need for purple doors beyond. Right?
Except that the purple key represents the highest security key the elves have. They used powerful magic to lock those doors and shroud them in walls of fire. Or ice. Whatever. So, any purple area is, logically, an area that the elves considered high security. Like, say, the magical labs where they worked with the magical crystals that started the whole downfall thing.
So, there is no way into Day 18 that doesn’t go through a purple door, even if it is coming from a brown or gray region. No matter what direction you come in from – no matter what direction the plot is going – it shouldn’t be possible to get into that space without going through a high-security door. Hence, I surrounded the entire area with purple doors, even if I had to set some of them back a little way in other regions.
Finally, if you look at Day 20, you’ll see one other geographical element. It’s just a little harder to spot.

When it comes to the passages that can only be overcome with flight, basically, we have to be dealing with very deep pits. And since the entire dungeon is built over a volcano, they can be deep and filled with glowing flows of lava. Or crevasses that open over a lava lake. Easy enough. Either the pits are so wide that jumping is just impossible – and the price for failure over a lava lake is ludicrously high – or the crevasses form winding, meandering passages with no good, straight lines of sight so as to discount any sort of short-range, site-to-site teleport.
With that in mind, we have a section of the Crypt of the Ageless that is only accessible to those who can fly. Why? Well, it is clearly crumbling and collapsing into the lava flows far below it. This section of the crypt may have a lot of open space. It might have pits and crevasses instead of walls, even. At least in places. With that in mind, I placed some flying-only passages carefully to split the area up into several “islands” or “landmasses.” Or, alternately, to create some large fissures or crevasses that spread through multiple rooms. Here, check it out:

I’m not sure whether they will end up being massive fractures and fault lines or whether the crypt will end up being islands over a giant lava pit. I’m not even sure I’ll end up using this idea at all. But by placing the brown exits in a pattern consistent with SOME SORT of geographical feature, I’ve left myself the option. Pretty cool, huh?
Okay, last little detail. I’ve laid down one annoying little red herring very late in the adventure. Check out the border between Day 16 – in blue – and Day 24 – in dark gray – here:

The story, on Day 24, is that the party has defeated the corrupting spirit and can now access the necromantically cursed spaces. Now, they need to seek out the spirits of the four founders of the dungeon so they can break the four-part seal that will allow the party to kill the Demon Queen and win the adventure. They know one of those spirits is in the Crypt of the Ageless, here in Day 24.
The proper way to reach this spirit is to climb down into the Crystalline Caves and then climb back up into the Crypt. That’s the critical path for Day 24. I did that because – way back in the beginning – I realized the critical path didn’t go through the Crystalline Caves enough and decided to route this plot point through there. So, to get the party to go searching down there – and also to create a little bit of a navigation “puzzle” – I did a little trick with the exits.
Once the party learns that one of the spirits is in the Crypt, they might remember – or notice on their map – that there was cursed area in the eastern part of the Crypt in Day 16. They will likely head there. But, once they enter, they will discover a passage they can’t get through. They are on the wrong side of a one-way door. They will have to find another way into that section of the crypt. Or find a way to destroy the one-way passage. Which they admittedly might do, depending on what form the one-way door ultimately takes. If they are smart, they will remember other cursed spaces and check them all out, including the ones in the Crystal Caves below and they will find a passage – probably through an undermined or ruined vault – that allows them to get up into the Crypt from down there.
Alternatively, they may not figure it out. Instead, after being thwarted by this passage, they might wander a lot before they blunder on the proper way in. Again, not foolproof, but that’s the price of an RPG.
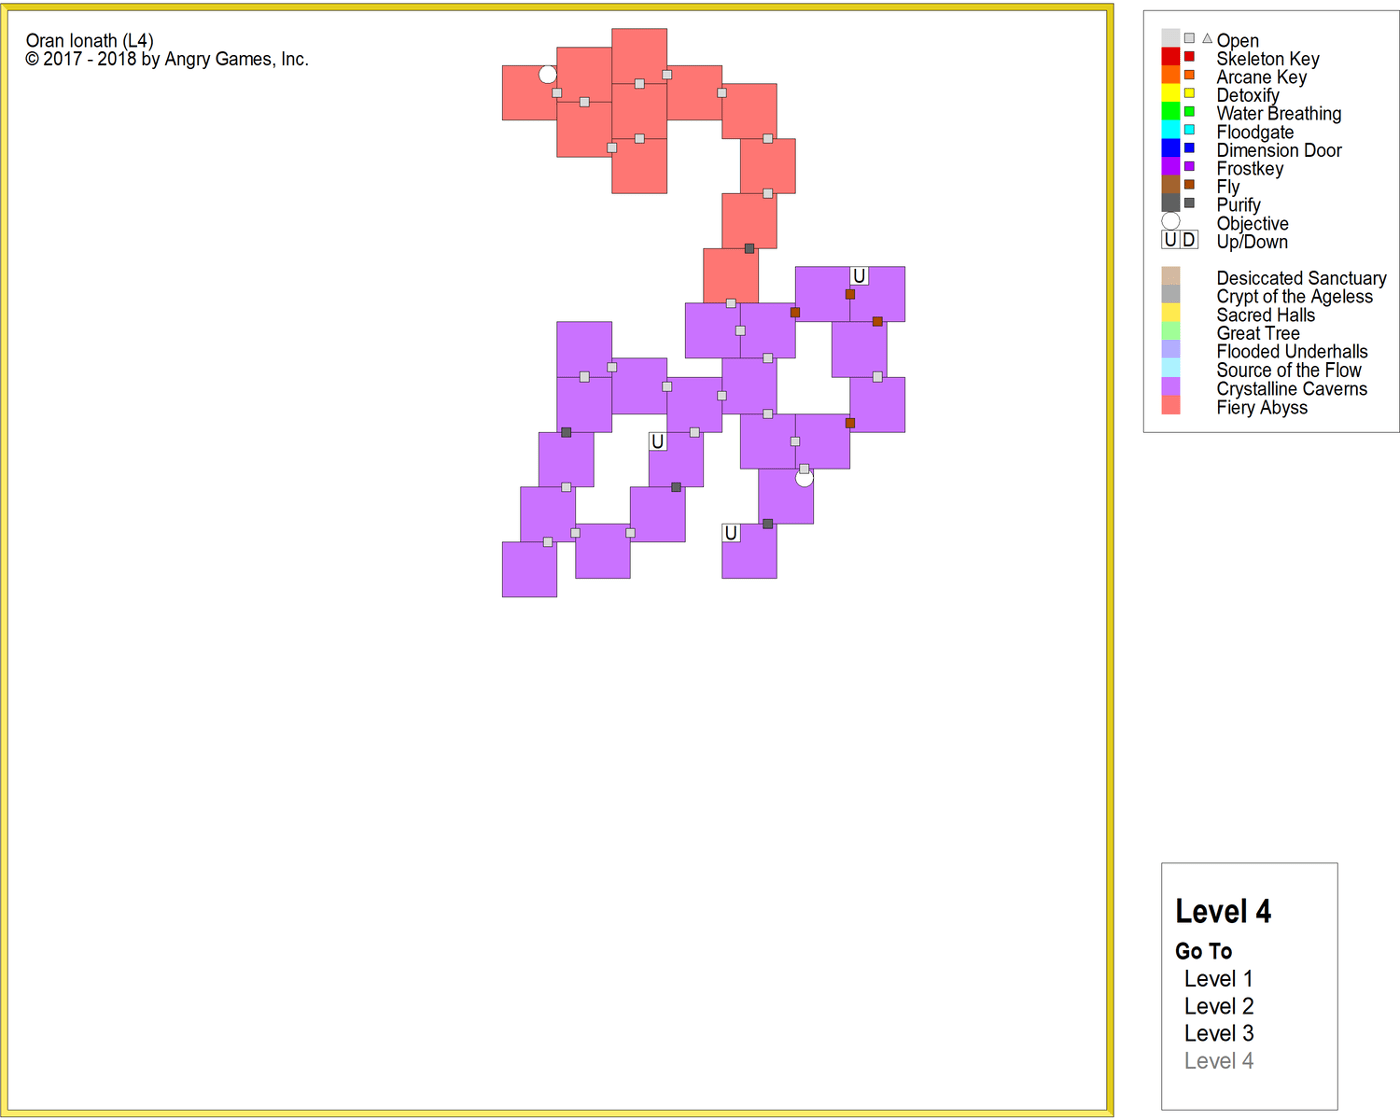
Level 4
Also, I did the exit map to Level 4.


I mean, there really isn’t anything left to discuss on the lowest level. It’s small and fairly linear. Especially the final day, which is just a gauntlet that leads to a Demon Queen. All the cool stuff happened on the previous levels.
The Complete Exit Map
What we’re left with now, once we conceal the critical path and the outlines of the various adventuring days, is a template for the dungeon map itself. The plot points, gates, keys, and critical path have been encoded – and concealed – in the color-coded exits between encounter areas. The dungeon has been divided up not into miniature dungeons representing days of adventure, but rather into geographical regions. The encounter spaces are all to scale, each one being 15 squares or 75 feet to a side. And into those spaces, we can just start drawing rooms and chambers and halls and caves and crypts and vaults and porticos and grottoes and sanctuaries and shrines and statuaries and gardens and everything else that actually makes up a dungeon map. At this point, no one who looks at this map would suspect how carefully the game has been plotted out. It just looks like a giant dungeon filled with possibilities to explore.
And that’s exactly what we want people to think.
But we’re not quite ready to start drawing individual rooms. Not if we really want to do this right. But we are ready to start designing the features of the dungeon as actual features and not just abstract ideas like “locked door” and “encounter space.” So, we’re going to start designing the evocative features that will actually make up the physical dungeon.
In the meanwhile, feel free to check out each of the four exit maps in detail. See if you can spot the critical path, and the side paths, and all of the other things that you KNOW are hidden there. Clicking on each image will bring you to a larger version of the image. Have fun.


I’m happy to see the return of this series, and agree the why of the hiatus doesn’t much matter. As always, thank you for writing and sharing it with us.
I very much enjoy the concepts of design explained in this series, and also really hope to buy and GM the final product someday!
Well worth the wait
THANK GOD THIS SERIES IS BACK!
I missed it so much.
Words cannot describe the excitement I felt when checking morning notifications to see the Megadungeon Monday article. This series is amazing, and I crave so much more.
I like your upfrontedness about not needing an explanation. I’m glad things are back on track, I’m glad everything is going well, and I cannot wait for more.
And finally, excellent article. I actually just finished re-reading the series to get my fix in, and if you hadn’t mentioned the hiatus, this article would have seemed like it was written right in step. Well done Angry.
And there goes my morning re-reading and catching back up. Glad to see this up and running again.
is the day 24 section off of day 3 supposed to be day 25?
It’s back! I was going to say that you can’t realize how much I love this series but looking at the intro I think you do.
Anyway, one question: The rules in the phb say that a player can hold his breath for 1 + Con modifier minutes (minimum 30 seconds). Even then, they have a number of rounds equal to their constitution to some back up for air. This means that a passage way that is simply “too long to hold your breath” would be ridiculously long.
Very few players will allow their Con Modifier to drop in the negatives, heck, most wizards my players play have at least +1 Con. So I feel that the reqirment would have to be higher then 2 minutes (and 12 seconds) (if your comfortable with the barbarian and the fighter pushing ahead, which I’m pretty sure you are since you had a similar opinion with druids and wildshape)
So… assuming a movement speed of 30 (which will effectively be 15 underwater, but they’ll probably also be dashing the whole way), we are looking at 300 feet per minute, so more than 600 (+60ft for the last few rounds if you want to be very precise) feet underwater passages, which is convieniently 2 football field lengths.
also, I think I remember you were planning on having passages filled with poisonous gas, they would expierience the same problem, though I also think you were going to have thorny roots forming walls to block the passages as well.
We are going to have to tinker with some of the more ridiculous rules. It’s unavoidable. But there are also things we can do to make things difficult. Winding passages, forks, slowing the party down, and requiring them to take strenuous activities like forcing doors and squeezing. And, as you point out, the whole party has to be able to pull this stuff off, or else the group is splitting the party. Beyond that, though, if the party really does push at an area like this, they can break the dungeon. You simply can’t avoid that. But if they break the level progression too much, they are going to find they have other problems. At that point, the difficulty in getting into regions the party shouldn’t be in will serve as “fair warning.”
alright, thanks for answering. looking forward to more Megadungeon monday!
I’m a former patron. Your blog is getting better again. Good luck!
I hope to one day buy something of yours in print.
Thank you.
What program do you use for the megadungeon map?
I use Profantasy’s Campaign Cartographer 3+ . You can check it out here: https://secure.profantasy.com/products/cc3-plus.asp
Hooray!!
It’s back and it does not disappoint.
We love you Angry! 😀 xxx
Really pleased this series is back. Don’t care why it went away for a while. More of this please!
Megadungeon is back! Hurray!
Maybe too early for this, but how are you going to handle retreat? After each “Day” of adventure if the players say “We want to go back to town” is there a fade out scene or they have to retreat by the GM narrating room to room again?
I’ve been speculating how the backtracking is going to work without it being tedious, but I guess that’s for the encounter section to answer.
The other question is how to handle frustrated players. I mean – the way I see it with the flooded passages(and the subtle difference between ‘green’ and ‘blue’) – the problem I see is if they get lost before the floodgates open they WILL most likely try to swim the flooded passages thinking it’s the only way through, especially anywhere after they get Water Breathing. I know I would. In some videogames wherever I got lost I ended up wasting time on a really difficult solution because I couldn’t come up with the more obvious answer.
My point is that I see the transition from Water Breathing to Floodgates door as the most dangerous part of the adventure in terms of potential failure. I’m not Angry, but maybe it would be a good idea to give them a small chance to interact with a flooded room and then unflood it on a small scale? Or being really descriptive about how the water seem to be flowing from somewhere. Or some sort of clue in the Discoveries?
Very pleased to see this back. I cant wait until this is finished to unleash it upon my poor players.
Just a note, the Source of the Flow color in you final maps do not correspond to the color you’ve assigned to it in the map colors key. It’s got the same color as the Flooded Underhalls.